Last Updated on March 10, 2025
Problems while printing checks or paychecks in QuickBooks are a common scenario among QB users. Many times, QuickBooks print checks in reverse order, or the order is incorrect. One can experience this problem due to wrong settings in print preferences, outdated Adobe software, or other common reasons. To fix this issue, you must follow a certain set of solutions, as mentioned in this comprehensive guide. So, let’s read further and learn how to tackle the check printing issues in QB Desktop and Online versions.
If your checks are printed in reverse order, the solutions given below will provide you with much-needed relief by addressing this issue effectively. However, if you are not ready to follow the steps on your own or do not have the adequate technical knowledge required to understand the procedure, you may require assistance. To get immediate assistance in resolving issues with QuickBooks print checks in reverse order, you can directly contact our Accounting Helpline’s support team at 1.855.738.2784.
Leading Reasons Why QuickBooks Desktop Prints Checks in Reverse Order
Various issues that may arise while printing checks can be very irritating, but before one knows how to solve this, one needs to know why they appear. Below, we have mentioned a list of common reasons that might be responsible for QuickBooks print checks in reverse order –
- The printer order preferences might be incorrectly set in your QB application.
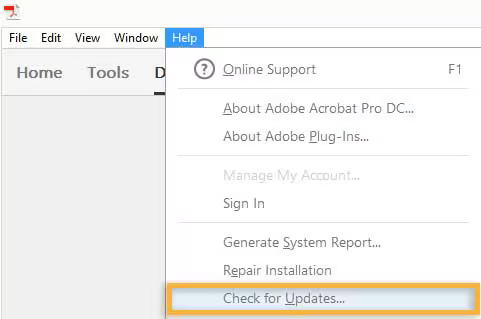
- You are not using Adobe Reader as the preferred app or the current Adobe version is outdated.
- The printing alignment in QuickBooks is incorrect and needs to be adjusted.
- Problems with the printer properties settings in the Windows OS can be another reason for the print order issue.
- The scales on your print dialog box might be incorrectly adjusted.
Solutions to Perform If Checks are Printing in Reverse Order in QuickBooks
If you are facing issues while printing the checks in QuickBooks, follow the steps mentioned in the following solutions to address the issue –
Solution 1 – Edit the Printer Order Preferences
A wrong printer order setup can be why your checks are printing in reverse order in QuickBooks Desktop. To resolve this issue, you must edit the printer setup and change the page order as follows –
- From the File menu of the QuickBooks homepage, select Printer Setup and open the Form Name dropdown.

- Now, choose the transaction type, select Options, and move to the Page Order field.
Note: Remember, the page order location depends on your printer choice; thus, you must check your printer’s manual or contact the manufacturer to find the right location. - Select either Front to back or Back to the front as your preferred order, then select OK to save the printer settings and click OK again to exit the printer setup window.
Once done, rerun QuickBooks and try to print the paychecks to check the order. If the checks are printing in reverse order, move to the next solution to resolve the issue.
Solution 2 – Install/Update the Adobe Reader App
If the print order doesn’t line up correctly, check if you are using the latest Adobe Reader version. You can download Adobe Reader and use it as the default PDF viewer for printing QuickBooks paychecks in the following manner –

- In QuickBooks Online, click + New, select Print Cheques, and click the Print Setup option.
- Select No, Continue Setup, click the latest version of Adobe Reader link to go to the page where you can download it, and return to QuickBooks.
- Next, select the ‘How?’ link to set Adobe Reader as your default PDF viewer, then move back to QB and select View Preview and Print Sample.
- Click Print to print a sample check, follow the onscreen prompts, and check the alignment of the sample.
If the checks are printing in reverse order in QuickBooks Online, move to the next troubleshooting solution to eliminate the issue.
Solution 3 – Review the Printing Alignment Setting
Problems with your printing alignment can lead to QuickBooks check printing template issues. To fix the printing order, ensure the alignment is correctly set using the instructions below –
- Go to the Toolbar, select the + icon, then go to the Vendors menu and select Print Checks.
- Now, select Print Setup from the bottom of the page, change the window to the Print Setup page, and choose “No, continue setup.”

- Move to the next screen, select “No, Continue,” and you will be on fine-tune alignment.
- Drag the grid in the large square to the place where it shows on your printout so that QuickBooks can figure out how to adjust the alignment.
- Select View Preview and Print Sample from the lower left corner, then choose Print from the bottom and check the sample print to ensure the alignment is correct.
- If you still require some fine-tuning, go back to the grid and adjust the size, then print a fresh sample and click the Finish Setup option.
Once the alignment is correct, try printing your paycheck in QuickBooks again. If QuickBooks prints checks in reverse order, move to the next solution to address the printing issues.
Solution 4 – Modify the Printer Properties in Windows OS
If none of the above solutions help, you can try changing the printer properties in your Windows OS using the detailed steps below –
- Open the Windows Start menu, access the Control Panel from the list, and select the Hardware and Sound option.
- Head to View Devices and Printers, select it, and right-click the printer icon to proceed.
- Ensure you select the correct printing preferences, search for the setting that shows the first or last page first, and click Save once all the changes are made.
After this, it is advisable to print a sample QB check so that the order can be checked as valid. However, if the sample print is incorrect and QuickBooks still prints checks in the wrong order, move to the next solution.
Solution 5 – Configure the Printer Dialog Box
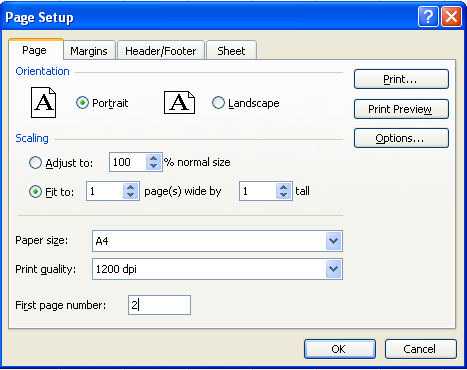
If the sample print is still off, you might need to change the scale on your print dialog box as a last resort. Below, we have mentioned the steps to adjust the print scale in Adobe Reader, but if you use another app, you must follow their specific steps –
- To change the print scale to “scale to fit,” choose the Windows hamburger menu, select Print, and open the Page Scaling pop-up menu.
- Select between Fit and Shrink Oversized Pages as required and click Print to print the check again.
You can also manually scale using custom percentages in Adobe with the help of the detailed steps below –
- Choose the Hamburger menu in Windows, go to the Print section, and move to the Print Sizing & Handling menu option.
- Select Custom Scale, enter the percentage to which you want to magnify or reduce the PDF prints, and click the Print button.
Once the printer dialog box is configured, you must rerun the paycheck prints in QuickBooks to ensure the issue is resolved.
The tried and tested solutions provided in this blog will help you fix issues when QuickBooks print checks in reverse order. However, if the solutions are not helpful and the printing order issues keep occurring, you must seek outside assistance. For this, contact our team of Accounting Helpline experts at 1.855.738.2784 to get professional guidance in resolving the paycheck printing problems in QB.
Common User Questions
What are the steps to remove the checks from the print queue in QuickBooks Desktop?
If you wish to learn how to remove paychecks from the print queue in QuickBooks Desktop, implement the following steps –
– Open QuickBooks Desktop, go to the Employees section, and select the Payroll Center option.
– Now, select the Pay Employees tab, scroll down to the Recent Payrolls section, and look for the payroll with To Print status.
– Right-click on the row, select Remove from Print Queue, and click Yes on the message to confirm the removal.
What is the procedure for printing the check details in the QuickBooks Online app?
You can learn how to print the check details in QuickBooks by using the following instructions –
– Open and log in to your QuickBooks Online company, then from the left navigational bar, go to the Reports tab.
– Now, in the Search bar, type Bill and Applied Payments, pick the result and enter a specific reporting period.
– Further, review the report, and if everything checks out, tap the Printer icon beside the Export icon to print the details.
I want to change the check printing settings in QuickBooks Desktop; how can I do so?
To learn how to change the check printing settings in QuickBooks Desktop, you must undertake the following steps –
– In QBDT, move to the Checks tab, select the Print Setup button, and select the Check Style you want to use.
– Now, from the drop-down menu, select Check Layout, Position, and Numbering, set the required settings, and click OK to confirm the action.
How can I reverse print the order of checks in the QuickBooks Desktop for Mac app?
To reverse print the paychecks in QB Desktop for Mac, follow the detailed steps below –
– Open the print dialog box by selecting the Print option and then go to the Paper Handling section.
– Now, move to the Page Order section, select the Reverse Print option, and click Print to proceed.

Edward Martin is a Technical Content Writer for our leading Accounting firm. He has over 10 years of experience in QuickBooks and Xero. He has also worked with Sage, FreshBooks, and many other software platforms. Edward’s passion for clarity, accuracy, and innovation is evident in his writing. He is well versed in how to simplify complex technical concepts and turn them into easy-to-understand content for our readers.


