Last Updated on April 16, 2026
QuickBooks Auto Data Recovery is one of the best features to have emerged in the QuickBooks application. This tool helps users recover lost data, which is pretty useful when files go corrupt, missing, or damaged. Let’s learn about this tool in detail to know what it entails and how you can utilize it to its full potential.
QuickBooks has time and again implemented features for the best user experience, and one such feature is QuickBooks Auto Data Recovery. This feature originated in 2010, starting with QuickBooks Pro/Premier, and then added to Enterprise in 2012. Using it, an automatic local backup copy is created of your company file. Auto Data Recovery feature makes use of two distinct Synbase technologies: auto replication’ which creates a duplicate of your QuickBooks Company (.QBW) file and the QuickBooks Transaction Log (.QBW.tlg) file, and ‘auto-recovery.’ This complete guide will help you understand QuickBooks Data Recovery and the process to recover lost QuickBooks Data with the help of it.
Are you confused about how to start QuickBooks auto data recovery on your system? Ring the support number 1.855.738.2784 for Immediate Assistance from Accounting Helpline professionals and experts
What is QuickBooks Data Recovery?
QuickBooks Recovery or Auto Data Recovery feature enables users to recover all or mostly all of the data if corruption or data loss happens due to any reason. Intuit Data Services are available to help users in most cases. However, it could mean you cannot use the QuickBooks application for quite a long time. Auto data recovery services are a quicker way to recover lost or corrupted data. The tool has to be used only after you apply all the troubleshooting methods available to resolve the issue at hand.
QuickBooks recovery software helps the recovery procedure of the lost file as follows:
- The lost transactions get restored through the current Transaction Log File and a copy of the company file.
- All the transactions except the ones made in the last few hours get restored with a copy of both the company file and the Transaction Log file.
Essentials to Remember Before Proceeding with the Service
Before you move forward to utilize the auto data recovery QuickBooks, you need to keep the following points in mind:
- The ADR file QuickBooks is only available in the Pro, Premier, and Enterprise solutions for Windows.
- The Accountant editions do not have this facility.
- There’s a limitation to the file size in ADR data recovery, which is 1.5 Gigabytes. When the backup of the QuickBooks file is larger than 1.5 gigabytes, the ADR file will not get generated.
- Ensure that your QuickBooks Desktop is updated to the latest release so that you can enjoy this feature to the full.
- The QuickBooks data recovery support solutions that are given below need to be followed in the order shown below.
Now, let’s proceed to the solutions for recovering the data file.
Method to Recover lost QuickBooks files using QuickBooks ADR
You need to use the QuickBooks data recovery software through the following methods:
Method 1: Utilizing the Original .TLG file with QBW.adr File
Recover QuickBooks file from the hard drive by using the original Transaction Log File and the ADR version of the company file as follows:
- Make a new folder on the desktop screen, naming it QBTest, and open the folder where the company file is saved.
Note: The location of the company file can be seen on the Product Information (F2 or Ctrl + 1) Screen or No Company Open Window. - Copy the Corresponding .tlg file and paste it to the QuickBooks Test Folder on your Desktop.
- Look for the .TLG file in the company file’s folder. The name will be the same as the company file. You need to show file extensions. Especially when you cannot identify the .tlg file, show the extensions as follows:
- Open the Windows Explorer.
- Now click on “Organise” and choose “Folder and Search Options”.
- Windows 10, 8.1 & 8: Click View and choose the File Name Extension
- Unmark the Hide Extensions for known file types.
- Click Apply, and for detailed instructions on displaying Windows hidden files and folders, follow the article How to Show Hidden Windows Files.
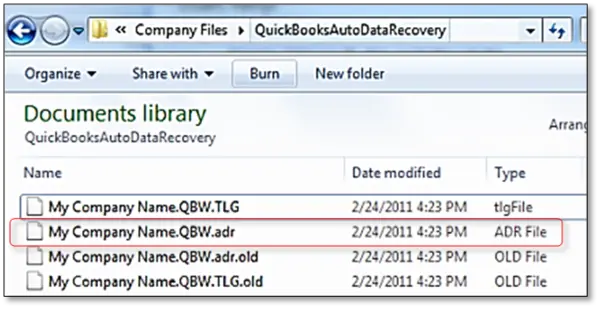
- Open the QuickBooksAutoDataRecovery tool. You will find it in the same location as that of the company file.
- Copy the .QBW.adr file and paste it to the QBTest. You should now have a .QBW.adr and .tlg file in your QBTest folder.
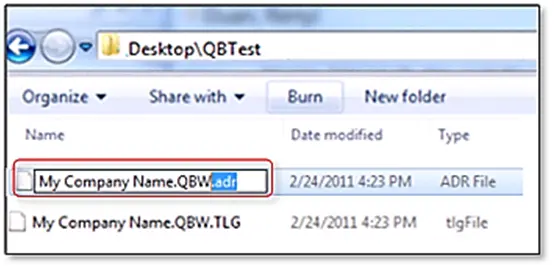
- Right-click the .QBW.adr file from the QBTest folder that was made on the Desktop and select Rename.
- Delete .adr present at the end of the file.
- Open QuickBooks.
- Open the company file that is saved on your QBTest. Use your account register to verify all transactions are there.
- Now Run QuickBooks Verify Data Utility to ensure the integrity of this company file. The steps involve going to the File menu, hitting the Utilities option, and selecting the Verify Data option.
- If this copy of the company file is fine, move the damaged company file to a different location.
- As a final step for the QuickBooks recovery tool, transfer the copy from QBTest to the original location.
Method 2: Make Use of .QBW.adr and .TLG.adr files
Further, use the ADR version of both the .QBW and .TLG files. You will recover everything but the previous 12 hours’ transactions through the QuickBooks restore deleted transaction software.
- Using this method correctly solves the question of How to recover QuickBooks Company files, but transactions up to 12 hrs can only be recovered.
- Create a new folder on your Desktop and name the folder QBTest.
- Open the folder QuickBooksAutoDataRecovery. You can find the company file location by going to the Product Information Screen (Press F2 or Ctrl + 1 on the keyboard) and the No Company Open Window.
- Find the .TLG.adr and .QBW.adr files, which have the same name as your company file.
Ensure that the file extensions are visible. If they aren’t, follow the steps mentioned below:
- Launch the File Explorer by hitting the Windows + E keys on the keyboard.
- Choose the Organize option, followed by clicking the Folder and Search Options.
- Hit the Hide Extensions for known file types option.
- Choose Apply, and proceed with OK.
- Copy the .TLG.adr and .QBW.adr files and paste them to the QBTest folder you made on the Desktop.
Create .QBW and .TLG Files in the QBTest Folder
- Make sure the Windows is set to display the hidden files.
- In the QBTest folder, remove the .adr from the end of the file name to get the qbw & .tlg files on the QBTest folder.
- Open QuickBooks.
- After you have opened QB, Open the company file that is saved in your QBTest folder. Verify all transactions are there.
- Run verify data utility to make sure the integrity of this company file is intact.
- If this copy of the company file is nice, you’ll be able to move the damaged company file to a different location.
- You can transfer the copy from QBTest to the original location.
How to Recover QuickBooks Data from a Hard Drive?
If you’re wondering how to recover QuickBooks data from a hard drive, your search ends here. Although QuickBooks is an excellent accounting application for users worldwide, you might sometimes encounter problems that might lead you to lose your essential data. In such cases, users need first to understand the cause of data loss before they begin with the troubleshooting solutions.
Causes of losing data in QuickBooks
Users may face corruption or data loss due to any of the following reasons:
- Upgrading the QuickBooks company file to a higher version may lead to the loss of some data.
- Updating the QuickBooks application can also cause problems with the data.
- There can be frustrating QuickBooks errors that have ruined the application’s functioning and led to damage.
- Many valuable files for running QuickBooks and the company file might have gone missing, damaged, or corrupt.
- A sudden power outage or system crash might lead users to lose unsaved and sometimes even saved data.
- Corrupt or broken database files can also contribute to QuickBooks lost data.
- Virus or malware infections are other reasons that may cause this problem.
- If the files got deleted unexpectedly, you would need to search how to recover deleted transactions in QuickBooks desktop.
Recovering the Lost QuickBooks Data
Now, it’s time to proceed with the recovery procedure of lost data. When searching for how to recover QuickBooks data, the auto data recovery tool appears at the top as the easiest and quickest way of restoration. However, users need to keep the essential points in mind before they utilize this tool and ensure to use it only as a last resort when no other method works.
Where are QuickBooks files stored?
You can find QuickBooks data files stored in the following locations:
- C:\users\public\public Documents\Intuit\QuickBooks\Company Files or
- C:\programData\Sage\Accounts\for sage or
- C:\Program Files\Intuit\ path
These paths will be able to tell you the versions and year of the application. Further, you can find the following extensions when you store QB files: .IIF, .QBA, .ND, .QBM, .QBB, .QBX, .QBY, and .QBW formats on your host machine.
Learn how to restore a deleted transaction in QuickBooks desktop by executing the steps mentioned below:
- Users need to begin by typing .qbw in the search field of the Start menu and pressing Enter.
- Further, users need to find as many duplicate company files as they can with the same company file name.
- Now, you need to note the file, right-click on it, and hit the Properties option.
- Further, users need to go to the General tab and ensure that the file is labeled as a company file in QuickBooks.
- Next, you should use the Date Modified feature in your system to isolate the file that has been updated most recently.
- After finding the file with the most recent modifications, you need to copy it to the CD, USB, or any other external drive.
- After copying the file, it’s time to delete all the residual files instantly.
- In the end, paste the originally copied file to the same location you copied it from.
This solution is helpful when you have multiple files on your desktop and hard drive, due to which you are missing the required file. However, if you need to recover deleted QuickBooks files or lost transactions, the auto data recovery tool in QuickBooks can help you. For this, you need to follow the methods and other essentials mentioned above in the blog.
Conclusion
The above-mentioned is an easy guide to QuickBooks Auto Data Recovery, and it must solve your issue to Recover lost QuickBooks files. QuickBooks File Recovery Tool is an efficient tool to help you get the files that might have been lost. If you are still stuck, place a call at 1.855.738.2784 for data recovery service by the Accounting Helpline experts.
FAQs
Which QuickBooks versions have the Auto data recovery feature?
Users can access the ADR feature in every version except the accountants. This includes Pro, Premier, and Enterprise versions of Windows.
What if the QBW.adr and tlg.adr files are not identifiable for the QB Auto data recovery tool?
When the essential files to run auto data recovery are not visible, you need to do the following steps:
1. Launch the File Explorer (Windows +E).
2. Hit the organize option.
3. Select Folder and Search options.
4. In Windows 8, 8.1, and 10, hit the View option.
5. Select the file name extension.
6. Hit the option Hide extension for known file types.
7. Select Apply, followed by the OK button.
Why do we need the QuickBooks Auto Data Recovery tool?
QuickBooks auto data recovery tool is necessary to restore and recover lost or damaged data. When other solutions for recovering the data do not work, this tool can be a savior. It is quick and efficient in running.
What is an ADR file in QuickBooks?
If you’re wondering what is an ADR file in QuickBooks, keep reading to understand the significance of this file. When users undertake the backup of their company files, QuickBooks creates a copy of the essential data of the application. This backup file is the foundation that lays the base to restore or recover the QuickBooks file and information when necessary. So, when you lose the data, it becomes essential that you recover it.
You will find this file under the folder named QuickBooks auto data recovery. It helps keep the files separate from others. This file has the added .adr extension and is known as the ADR file in QuickBooks. The expression at the end of the file name goes .QBW.adr. It recognizes the file type and its significance. You need to ensure that it doesn’t get deleted. Otherwise, it will make the recovery procedure too complicated and hard to handle.
What is a tlg file in QuickBooks?
Further, if you have queries regarding what is a tlg file in QuickBooks, you’ll find the answer here. The TLG file is also known as the Transaction Log File in QuickBooks and holds the utmost significance in the data restoration procedure. QuickBooks uses the TLG file in between backups. While restoring the backup file, known as the .QBB file, you can copy the tlg file to the directory and then proceed with opening the data file in QuickBooks. If all goes well, you will be able to load the company file and the tlg file.
What are the Two Methods of QuickBooks Auto Data Recovery?
The QuickBooks file recovery in the QuickBooks application is vital to recovering the lost files of your business in one of two ways.
Recreate lost transactions using the current QuickBooks Transaction Log (.QBW.tlg) file and a previous copy of the QuickBooks Company (.QBW) file.
Or
Recreate all but the last few hours of transactions with a copy of both the QuickBooks Company (.QBW) file and the QuickBooks Transaction Log (.QBW.tlg) file.
What are the Four Major Components of QuickBooks Desktop Required to Recover Lost Company File?
Ensure to keep the following three components in mind when you utilize QuickBooks data recovery service:
1. The QuickBooks Desktop application is completely installed and activated.
2. QuickBooks Company (.QBW) file that is stored on the computer hard drive and contains your data.
3. The QuickBooks Database Server (which really is the Sybase Database Server).
4. There are several other ‘little files’ that tend to be created when you have set up your QuickBooks Company file, and one of these files is the QuickBooks Transaction Log (.QBW.tlg) file that you will need.

Edward Martin is a Technical Content Writer for our leading Accounting firm. He has over 10 years of experience in QuickBooks and Xero. He has also worked with Sage, FreshBooks, and many other software platforms. Edward’s passion for clarity, accuracy, and innovation is evident in his writing. He is well versed in how to simplify complex technical concepts and turn them into easy-to-understand content for our readers.