
Last Updated on April 23, 2026
If your access to QuickBooks Point of Sale is restricted because of QuickBooks Point of Sale XML Errors, this guide will walk you through the easiest solutions to fix it like a pro.
While using QuickBooks Point of Sale, you may occasionally get XML errors, a known error to Intuit®, and can easily be rectified with basic troubleshooting. You might get one of the error messages once you open QB Desktop Point of Sale: “Error: Process could not access file C: \ Program Data\ Intuit\ Entitlement Client\v(x)\SessionData.xml because it is being used by another process” or “There is an error in XML document (0, 0).” Further, in this article, you will find detailed troubleshooting instructions to resolve the error along with the causes of the error, so follow the entire article for complete information.
Accounting Helpline’s Point of Sale Team is Just a Phone Call Away. Call 1.855.738.2784 for Immediate POS Assistance for QuickBooks Point of Sale XML Errors.
What Causes XML Errors in QuickBooks Point of Sale?
Following are some of the reasons that might cause QuickBooks Point of Sale XML Errors:
- The file required to save the HTTP session data, SessionData.xml, is damaged or corrupt.
- Damaged Desktop Entitlement Client folder of QuickBooks Point of Sale.
- Corrupt or incomplete installation of QuickBooks Point of Sale also sometimes triggers XML errors.
Troubleshooting Steps to Resolve QuickBooks POS XML Errors
The various solutions you can implement to resolve the QB Desktop Point of Sale XML errors are as follows:
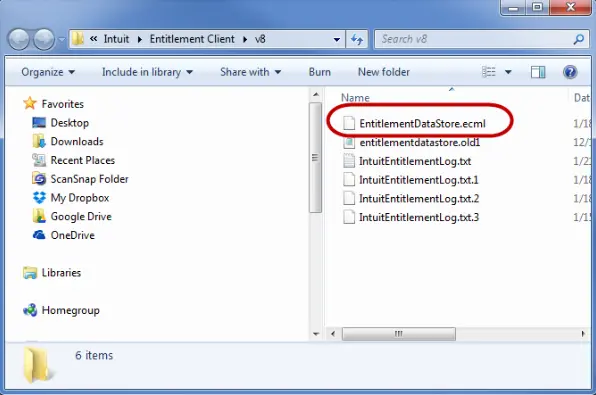
Solution 1: Delete Files Within the Entitlement Folder
Removing files within the Entitlement folder can help you resolve the QuickBooks XML errors:
- Press Windows + R and type services.msc in the Run window’s text box.
- Hit OK and locate Intuit Entitlement Service.
- Right-click the service and select Stop.
- Exit the window and follow the steps below to display hidden files and folders:
- Press the Windows + R keys together to open Windows File Manager on your desktop screen.
- Click Organize and then select Folder and Search Options.
- Click Show hidden files and folders under the View
- Now unmark the Hide protected system operating files
- Click Yes for the confirmation and then select Apply and OK.
- Open Windows file manager and navigate to C:\ProgramData\Intuit\ Entitlement Client\ v(xx). Now, remove all the files within this folder.
Solution 2: Repair QB Point of Sale Application
Often, damage in the program results in several errors that you face using QuickBooks. Fortunately, program damage can easily be repaired using the easy and quick steps below.
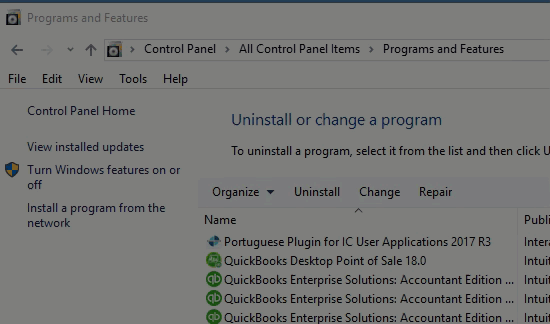
- Press Windows + R, and once the Run window appears, type appwiz.cpl in the text box.
- Press Enter or click OK.
- Locate and click QuickBooks Point of Sale from the list and select Uninstall/Change.
- Click Next and then select Repair.
- Wait until the application is repaired, and then restart your computer.
Solution 3: Undertake QB Desktop POS Clean Install
You may have to clean install QuickBooks Desktop Point of Sale to resolve the XML errors when nothing else works. Clean installation is occasionally necessary to address issues encountered during the installation or while using the software. Follow these steps for a thorough uninstallation and subsequent reinstallation of QuickBooks Point of Sale on your computer.
Step 1: Prerequisites to Reinstalling QB Point of Sale
Before proceeding, ensure that:
- You have backed up your data file.
- You have the QuickBooks Desktop Point of Sale download file or the installation CD.
- Your License and Product Numbers are readily available.
- You can log in as the Windows Administrator before moving on to the next steps.
- The PCs you are working on can be rebooted.
Step 2: Uninstall QB Point of Sale
Follow the steps below to remove the QB Point of Sale app from your folder:
- Press the Windows + R keys on your keyboard to launch the Run window.
- Type “Control Panel” and hit OK.
- Hit “Programs and Features.” Important Note: If you see the Control Panel in Category View, tap “Uninstall a Program.”
- From the list of programs, choose QuickBooks Desktop Point of Sale, then tap Uninstall/Change.
- Follow the on-screen instructions to complete the app removal process.
Step 3: Rename QBPOS Installation Folders
If you are removing the program from the server computer (or the computer where the POS data file is locally saved), do the following:
- Right-click and copy the Point of Sale data folder and paste it to the Desktop.
- As a suggestion, add ‘OLD’ at the end of the QBPOS installation folder name. This will prevent QuickBooks Desktop Point of Sale from recognizing the QBPOS installation folder and creating a new one.
Folder locations you can navigate to
- C:\ProgramData\Intuit\QuickBooks Desktop Point of Sale 18.0
- C:\Program Files (x86)\Intuit\QuickBooks POS XX
- C:\Users\Public\Public Documents\Intuit\QuickBooks POS XX
- C:\Program Files (x86)\Common Files\Intuit\Entitlement Client\v8
You can follow the steps below to remove the QBPOSDBSrvUser Windows user:
- Click on Windows Start and access the Control Panel.
- Select User Accounts and hit Manage another account.
- Tap the Continue option in the User Account Control window.
- Tap QBPOSDBSrvUser and click Delete the account.
- Confirm you have deleted the folder.
- Restart your system.
Step 4: Install QuickBooks POS
Now, follow the system requirements, download the QBPOS installer, and complete its installation. When the Point of Sale download is complete, follow these steps:
- Open the QuickBooks installation file on your desktop. If prompted to overwrite existing extracted files, choose “Yes to All.”
- Click “Next” on the wizard to initiate the installation.
- Review the License Agreement. If you agree, click “I accept the terms in the license agreement,” then tap “Next.”
- Input your license and product number, and then click “Next.”
- Choose the type of installation:
- Only this computer: Use for a single user.
- Two or more computers: Use if you have multiple users.
- If installing on two or more computers, select the type of workstation:
- Server workstation: Creates and keeps your company data.
- Client workstation: Typically the cash register is used for daily sales and program access.
- Click “Install” to begin the installation.
- Note: QuickBooks Point of Sale must be installed in the following file path: C:\Program Files (x86)\Intuit\QuickBooks Desktop Point of Sale (version).
- After installation, activate QuickBooks Point of Sale. You may need to restart your computer and reopen QuickBooks to begin.
Step 5: Restore your Backup Files
If you couldn’t create a backup, restore the qbpos.db file situated in the data folder copied to your desktop.
- Launch QuickBooks Point of Sale, create a new company file using your desired name, and restore the previously created backup.
- After restoring the file and confirming it contains the correct data, ensure that you can close and reopen Point of Sale without encountering errors. Additionally, check if it can connect with other POS machines and with QuickBooks Desktop (if applicable).
- Register QuickBooks Point of Sale once again.
Since QuickBooks Desktop and Point of Sale share some licensing files, confirm that you can still open QuickBooks Desktop and register if prompted. If you wish to remove the data folder from your desktop, relocate it to another folder like Public Documents or Shared Documents, but refrain from deleting it.
Conclusion
You can also call Accounting Helpline’s Point of Sale Support toll-free number, 1.855.738.2784 if you are not feeling comfortable following the troubleshooting steps mentioned above. Our support team is available 24/7 to help QuickBooks users with such QuickBooks Point of Sale XML Errors and provides an instant solution in the shortest time possible. So don’t wait and call our support number for immediate help and support.
FAQs
What are the various instances where you face QuickBooks XML errors?
The various scenarios where you can encounter QuickBooks XML errors:
1. Opening QuickBooks Desktop Point of Sale can cause crashes because of XML errors.
2. The Event Viewer may show “Removed Part: /xl/sharedStrings.xml part with XML error. (Strings) Xml parsing error Line 1, column 97146” when you export the Profit and Loss report from QB 2021 Desktop Mac software.
3. QB crashes when setting up margins within templates with XML errors in the Event Viewer.
How do I create QuickBooks Desktop Point of Sale file backups?
The steps to create QB Desktop Point of Sale data backups are as follows:
1. Tap “Back Up Data” from the File menu.
2. Specify the backup location:
Tap “Default Location” to back up to the default folder on your local drive.
Alternatively, choose “Specify Alternate Location” to back up to a network or removable drive.
3. Click “Backup” and then “Finish.”
What do I do when QB crashes while setting printing margins due to XML errors?
When you encounter QuickBooks crashes while setting printing margins due to XML errors, do the following:
1. Rename the QBprint.qbp file
2. Have the latest printer drivers
3. Test printing in QB
4. Use QB Print and PDF Repair Tool

Edward Martin is a Technical Content Writer for our leading Accounting firm. He has over 10 years of experience in QuickBooks and Xero. He has also worked with Sage, FreshBooks, and many other software platforms. Edward’s passion for clarity, accuracy, and innovation is evident in his writing. He is well versed in how to simplify complex technical concepts and turn them into easy-to-understand content for our readers.