Last Updated on March 11, 2025
If you are a quickbooks user who manages online banking from within the quickbooks Desktop application then sooner or later you will require to merge vendors in quickbooks. The need to merge multiple vendors in quickbooks evolves because of duplicate entries in the vendors list. Duplicate entries in the vendors or customers list made it difficult to search for a specific transaction for a customer or a vendor. With the latest feature of quickbooks for accountant 2019, you can easily merge up to four vendors at a time that makes the merging process effortless for the users. For detailed instructions on how to merge vendors in quickbooks follow the complete article until the end.
Call Accounting Helpline Support Number 1.855.738.2784 and Get Help Merging Vendors in QuickBooks Desktop
Important Points to Consider before Merging Vendors in QuickBooks
- Make sure to take a secure backup of your QuickBooks company file before merging vendors in QuickBooks.
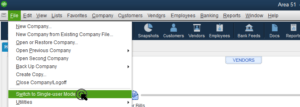
- If you are running quickbooks in Multi-User mode then switch it to Single-User mode.

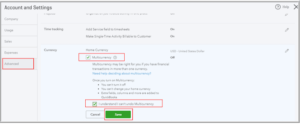
- Ensure that the Multi-Currency feature in turned-off.

- Make sure you are not merging Tax Authorities vendors, Paid through Online Banking, Tax Exempt, and Direct Deposit vendors.
- The merge process cannot be undone so make sure you merge the accounts when you really need it.
- If you want to undo a merge then the only way is to restore the backup of the data file.
How to Merge Vendors in quickbooks Desktop 2018 and Earlier Versions?
- Open quickbooks and from the Vendor Center click Vendors.
- Note down the name of the vendors that needs to be merged.

- Now locate the vendor that requires merging and right-click it.
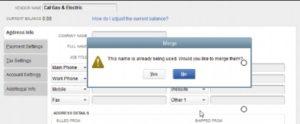
- Choose Edit and enter the name of the vendor that you want to merge it with.
- Click OK and once the confirmation screen pops up click Yes.
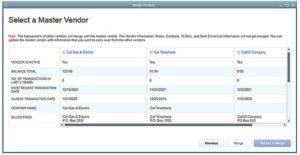
Steps to Merge Vendors in quickbooks Desktop 2019
- Open quickbooks Desktop 2019 and navigate to the Merge Vendor window.
- For Accountant version go to the Accountant section select Client Data Review and then click Merge Vendors.

- quickbooks Desktop Enterprise users go to the Company tab, choose Accounting Tools and then select Merge Vendors.

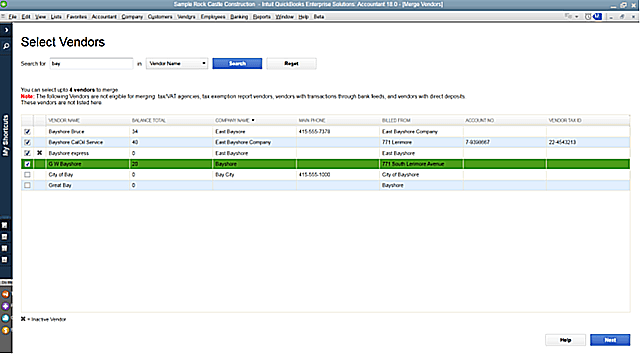
- Now select the vendors that you want to merge and click Next.
- Now select the vendor in which you want to merge the other vendor and click Merge.

- Once the confirmation window pops up click Yes and then hit OK on the Merge Complete message.

Following the method mentioned above, you can easily merge vendors in QuickBooks however you must plan everything before merging as it cannot be undone. If you need to consult a certified specialist before merging accounts in QuickBooks then you can contact us at Accounting Helpline direct helpline number 1.855.738.2784.

Edward Martin is a Technical Content Writer for our leading Accounting firm. He has over 10 years of experience in QuickBooks and Xero. He has also worked with Sage, FreshBooks, and many other software platforms. Edward’s passion for clarity, accuracy, and innovation is evident in his writing. He is well versed in how to simplify complex technical concepts and turn them into easy-to-understand content for our readers.