
Last Updated on August 11, 2025
If your QuickBooks not seeing mapped drives, the issue can arise due to network connection problems. An incorrectly mapped drive or issues while finding the UNC path can also trigger this issue. The issue can prevent users from accessing the mapped drive while opening or saving a file. You can resolve the mapped drive issue by performing solutions like activating Network Discovery. This article will discuss the best solutions to help you fix the mapped network drive problem in QuickBooks Desktop.
Are you having trouble finding the mapped drive in QB? Don’t worry; follow the troubleshooting guide below to fix the issue. However, if you don’t want to resolve the issue on your own, you can contact the Accounting Helpline team at 1.855.738.2784 for faster resolution.

Main Reasons Why QuickBooks Does Not See Mapped Drives
If your QuickBooks Desktop cannot find the mapped drives, you must first understand why this problem occurs. Below, we have provided a list of reasons that can be responsible for this mapped drive problem –
- The Network Discovery option is not activated in your Windows OS.
- Your network drive is not mapped correctly, which could be why QuickBooks not seeing mapped drives.
- There are problems while finding the UNC path, and you aren’t able to obtain the IP address and DNS automatically.
- The computer is not connected to the path where the QB file is located, or the file has been deleted from the PC.
- Your QB company data file might have been renamed or moved to another folder/location.
- You are not using a Windows user account with admin rights while using QuickBooks Desktop.
- Your QuickBooks Desktop program might be damaged, or it is incorrectly or incompletely installed on the PC.
These are the possible reasons why QB can’t see the mapped drives. Now, let’s learn how to resolve this mapped drive issue in the next section.
Solutions to Perform If You Are Unable to Access Your Mapped Drives
After learning about the reasons why this problem occurs, you must perform the troubleshooting process. Follow the practical solutions given below to fix the QuickBooks not seeing mapped drives-
Solution 1 – Turn On Network Discovery
If QuickBooks not seeing mapped drives, the Network Discovery might be turned off. To resolve the mapped drive issue, turn the Network Discovery by using the following steps –
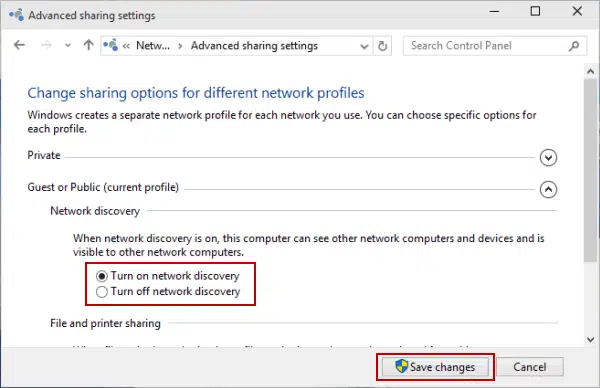
- Enter “Settings” in the Windows search box, then move to the Settings tab.
- Now, click Sharing Options, then select and expand the Private Network.
- Select the Turn On Network Discovery option and click Turn on Automatic Setup of Network-Connected Devices.
- Finally, select Save Changes to turn on Network Discovery and end the process.
Once the Network Discovery is on, rerun QuickBooks and check if you can see the mapped network drive. If you still have issues finding the mapped drive, move to the next troubleshooting solution.
Solution 2 – Map a Network Drive in Windows
If you aren’t able to find the mapped drives, try remapping the network drive in your Windows OS version by using the steps below –
Windows 7
If you are a Windows 7 user, perform the following steps to map the network drive –
- From the Windows Start menu, go to the Computers tab and select the Map Network Drive option.
- Select any available Drive Letter from the Drive list, then open the Folder box and type the folder/computer path. Alternatively, you can click Browse to locate the folder/computer path.
- Finally, mark the “Reconnect at Logon” checkbox to connect whenever you log in to the PC and hit Finish.
Note: If you can’t connect to the network drive or folder, the PC might be turned off or not have sufficient permissions. In this scenario, contact the network admin for assistance.
Windows 8 & 10
To map a network drive on Windows 8 & 10 versions, follow the steps below –
- Open Windows File Explorer by pressing the Windows + E keys or from the Taskbar or the Windows Start menu.
- Click This PC from the left pane, move to the Computer tab, and select the Map Network Drive option.
- Now, open the Drive list, choose a Drive Letter (any available letter will work), and open the Folder box.
- Next, type the path of the folder/computer or select Browse to locate the folder/computer.
- Lastly, click Reconnect at Sign-in to connect whenever you sign in to the PC and select Finish.
Windows 11
If you use a Windows 11 operating system, map the network drive by implementing the following steps –
- Access Windows File Explorer from the Taskbar or the Windows Start menu and select This PC. Alternatively, press the Windows + E keys to open the File Explorer.
- Move to the File Explorer ribbon, select More, and click Map Network Drive.
- Open the Drive list to select any available Drive Letter and open the Folder box.
Note: If you can’t find the Map Network Drive in the More menu, right-click This PC in the folder pane to see the command.
- Type the folder/computer path or click Browse to find the folder/computer path, then select Reconnect at Sign-in and click Finish.
Once you’ve done this, try opening QB with the newly mapped network drive. However, if you are still unable to view mapped drives in QuickBooks Desktop, move to the next solution.
Solution 3 – Manually Open Your Company File
Issues while finding the mapped device can arise if there is a change in the company file name or location. In such cases, you must locate the company file by doing a wildcard search, then access it in the following way –
Step 1 – Search for All Company Files
Open your server computer and perform a wildcard search for all company files by inserting the following extensions in the search bar –
- *.qbw (Working Files)
- *.qbb (Back Up Files)
- *.qba (Accountants Copy Files)
- *.qbx (Accountants Transfer Files)
- *.qby (Accountants Change Files)
Ensure that the Asterisk (*) is included before the extension type, and note down the file location after finding it. Once done, move to step 2 to open the .QBW file.
Step 2 – Access the .QBW File
Once the file location is found, open the company file in QuickBooks Desktop by performing the following steps –
- Move to the File menu, select Open or Restore Company, and select the Open a Company File option.
- Click Next, choose the QB company file you want to access and select Open.
Now, check if you can access the file on the mapped network drive. However, if QuickBooks not seeing mapped drives, follow the next solution.
Solution 4 – Get the IP Address and DNS
If you face trouble finding the UNC path, it can cause problems with the mapped drive. In such a case, obtain and use the server’s IP address and DNS in the following manner –
- From the Windows Start menu, move to the Settings tab and access the Control Panel.
- Click Network and Internet, then select Network and Sharing Center from the Control Panel window.
- Next, select the Change Adapter option and go to the Network Connection window.
- Further, right-click Ethernet, choose Properties from the available list, and select the Networking section.
- Find Internet Protocol Version 4 and choose it from the list, then unmark the box next to it if it’s already selected.
- Select the Properties option to access the IPv4 properties, then click Obtain the IP Address Automatically.
- Lastly, select Obtain DNS Server Address Automatically and hit OK to save the settings.
Now, your computer will connect to the network without requiring you to insert the settings manually. Once done, rerun QB Desktop and check if you can find the mapped device. If you are unable to find the mapped network device option, move to the next troubleshooting solution.
Solution 5 – Review the Connection by Pinging the Server
Issues while finding the mapped drive can occur if the computer is disconnected from the path where the QuickBooks file is located. To ensure you are connected, review the network connection by pinging the server as follows –
- Press the Windows + R keys to access the Run window, type “CMD” in the command prompt, and click OK.
- Input the “ipconfig/all” command, click Enter, and note down the Host/Server Name.
- Now, type “ping [name of your server],” select Enter, and check the reply for each packet in the following manner –
- If you see a prompt reply for each data packet, your computer is connected to the network, and there are no connection issues.
- On the other hand, if the data packet is lost or the reply is slow, there are network issues. To fix the network problems, contact an IT professional and get proper assistance.
After the connection problems are resolved, check if you can access the mapped network drive. If the QuickBooks not seeing mapped drives, move to the next solution.
Solution 6 – Configure a User Account as an Administrator
A lack of proper admin rights can prevent QuickBooks not seeing mapped drives while performing important functions, like saving files or PDFs. If you can no longer see the network drive, ensure you are running your PC and QuickBooks with proper admin privileges. If not, configure your user account into an admin account by using the following steps –
- Go to the Settings tab on your PC, then select Accounts and click the Other Users option.
- Move to the Other Users section, choose the flyout for the account you want to change, and click Change Account Type next to Account Options.
- Finally, select the Account Type as Admin from the drop-down list and hit OK.
Once the Windows user account has admin rights, run QuickBooks Desktop as an admin. Then, check if you can see the mapped network drive while saving the file or PDF. If QuickBooks is unable to discover the mapped network drive, move to the next solution.
Solution 7 – Repair QuickBooks Desktop
A damaged QB program or faulty installation process can be why the mapped drive is not displaying. To fix the mapped drive problems, try repairing QuickBooks with the QuickBooks Tool Hub utilities. Firstly, ensure to download and install the most recent QuickBooks Tool Hub version, then implement the steps given below –
Step 1 – Use the Quick Fix My Program Tool
You can use this tool to run a program repair process and fix the QB program problems. To run Quick Fix My Program, perform the steps mentioned below –
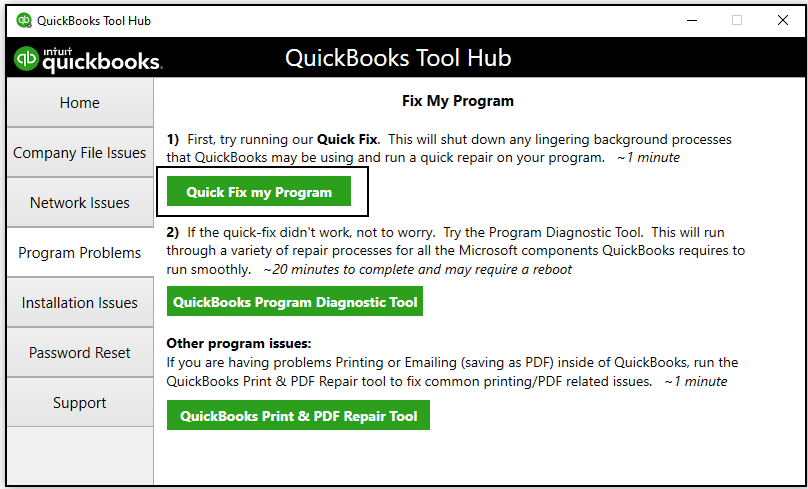
- Firstly, open the QuickBooks Tool Hub, then move to the Program Problems tab and click the Quick Fix My Program tool.
- Initiate the program repair process, then once the tool stops, restart QB and access your data file.
Check if you can see the mapped drive while opening the file. If QuickBooks does not see any mapped network drives, move to step 2.
Step 2 – Utilize the QB Install Diagnostic Tool
You can fix the installation problems in QB by running the QuickBooks Install Diagnostic tool in the following way –
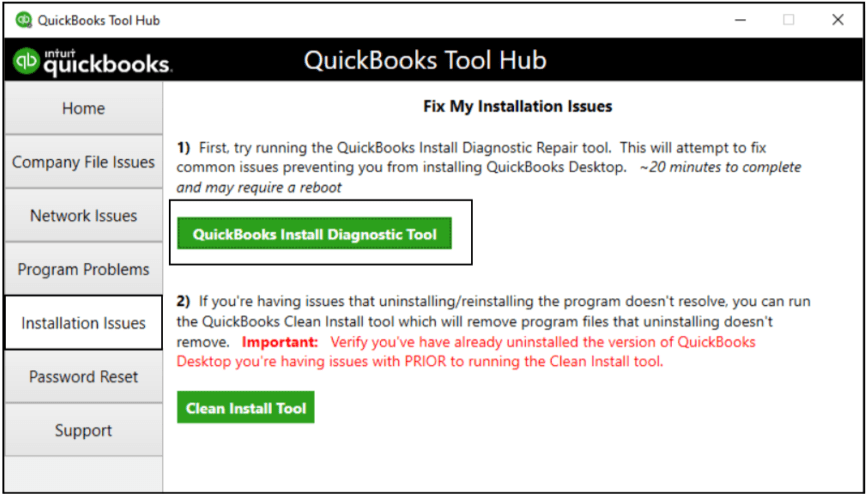
- Launch the QuickBooks Tool Hub program, navigate to the Installation Issues tab, and select the QuickBooks Install Diagnostic tool.
- Run the tool and perform an installation repair process, which can take around 20 minutes.
- Once done, restart your computer and run QuickBooks Desktop, then access the data file.
Now, make sure that QuickBooks Desktop is updated to the latest release and you have the most recent fixes and security updates. Then, access the network drive, but if you still encounter the QuickBooks not seeing mapped drives problem, follow the next solution.
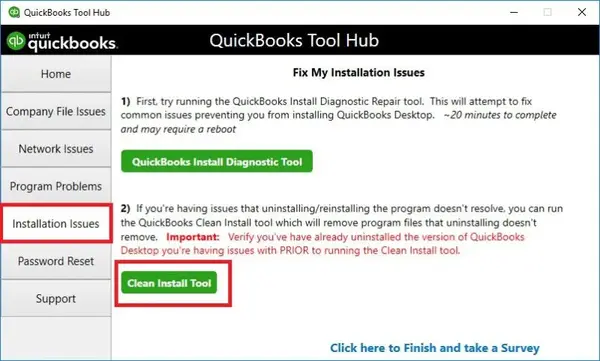
Solution 8 – Clean Install QuickBooks Desktop
If running a repair process doesn’t help fix the installation issues, you can try reinstalling the software. You can use the Clean Install tool to install a fresh QuickBooks Desktop version that is free of any issues and glitches you encountered in the current version.
Once done, rerun QuickBooks and check if you can find the mapped network drives to ensure the problem is fixed.
Conclusion
We hope this detailed guide helps you resolve the mapped drive issues easily. However, if this troubleshooting process doesn’t help and QuickBooks not seeing mapped drives, you can contact Accounting Helpline expert team at 1.855.738.2784 for immediate assistance.
FAQs
What is the distinction between a mapped drive and a network drive?
Can your antivirus program prevent QuickBooks from seeing the mapped drives?
1. Enter “Windows Security” in the Windows search box, then select the Windows Security app and go to Virus & Threat Protection.
2. Under the Settings tab, select the Manage Settings option and switch the Real-time Protection to Off.
Once the antivirus is disabled, find your mapped drive, then follow these steps and turn the anti-virus protection back on.
How can I access my company files if QuickBooks Desktop is not showing mapped drives?
1. Employ the UNC path to open the QuickBooks company file.
2. Open the company file after moving it to the hard drive.
3. Use the company file backup and restore the backup file to some new location.

Edward Martin is a Technical Content Writer for our leading Accounting firm. He has over 10 years of experience in QuickBooks and Xero. He has also worked with Sage, FreshBooks, and many other software platforms. Edward’s passion for clarity, accuracy, and innovation is evident in his writing. He is well versed in how to simplify complex technical concepts and turn them into easy-to-understand content for our readers.