
Last Updated on February 26, 2026
Inventory is an indispensable asset for any business. Both the manufacturer and retailers can work seamlessly by keeping stock. If they have proper records, they can conveniently manufacture/produce products or sell them. Inventory plays a crucial role in a business’s financial position, so it should be properly recorded in the accounts. Inventory turnover helps businesses make informed decisions about marketing, manufacturing, and pricing goods.
QuickBooks Desktop has an in-built inventory management feature. QuickBooks Desktop inventory helps track in-stock items. This QBD feature enables you to easily track the inventory value for every sale and purchase of goods. It also helps meet business requirements by properly verifying the items/goods in the warehouse. In this blog, we will discuss how to set up inventory in QuickBooks and the tips to improve the QBD management.
Are you experiencing inconvenience in setting up inventory in QuickBooks Desktop? Don’t hesitate to contact our Accounting Helpline Experts at 1.855.738.2784 for quick solutions.

How Can You Set up QuickBooks Desktop Inventory?
Managing the financial wing of businesses can be burdensome and overwhelming. In these situations, you can’t drop other important tasks and stay hooked on managing finances and accounts only. Now we will discuss how to set up inventory in QuickBooks Desktop:
- Begin by opening QuickBooks Desktop.
- Go to the Menu option and choose Edit.
- Then, choose the Preferences option.
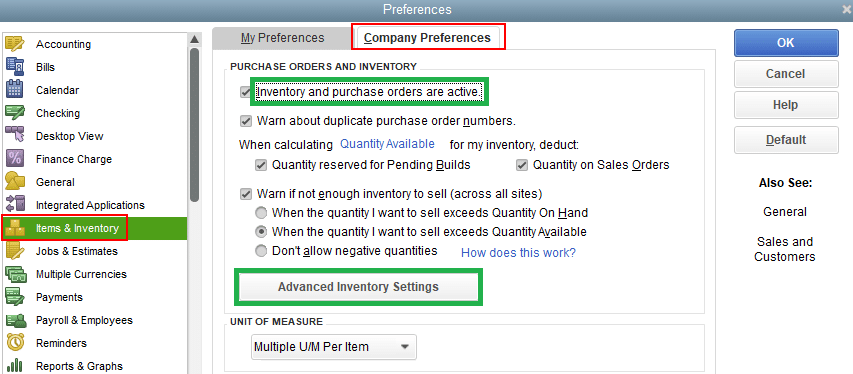
- Next, navigate to the left-hand list and tap on the option of Item & Inventory.
- After that, click on the Company Preferences tab and activate Inventory and Purchase Orders by verifying the box.
- To follow this step, select the OK option. Then you will see a warning message that says the software will close all open windows to change this preference.
- Choose the OK button on the warning message.
When you are done setting up inventory in QB, proceed to the next action, i.e., adding the inventory.
How Can You Add Inventory Items in QuickBooks Desktop?
After turning on the Inventory feature in QuickBooks Desktop, you need to add inventory items in QBD. Follow the steps mentioned below:
- First, choose the Service icon on the QB’s Home Page.
- After selecting it, select items from the dropdown menu, then click the New option.
- Then, select the Type option and choose the Inventory Part from the type dropdown.
- Now, you will see the number of options that have to be filled. The options given below:
- First, you need to enter the Item Identifier in the Item Name/Number Field. In this option, you have to provide the item name or the item’s serial number. It helps track, search for, and find items as the company’s requirements change.
- If you are using QuickBooks Premier or a later version, you only need to fill in the unit of measure field. Otherwise, leave it blank.
- In the Purchase Field, fill in the purchase information.
- Then, add sales info in the Sales Field.
- When you are done filling in purchase and sales information, QB automatically identifies the COGS (Cost of Goods Sold) account.
- Navigate to the Income Account section to enter the inventory’s income account. This helps track income from this inventory.
How to Turn on the Advanced Inventory Feature in QuickBooks?
The advanced inventory feature in QuickBooks Enterprise helps to use the options mentioned below:
- Multiple Location Inventory
- FIFO Costing (First in First out Costing)
- Bin or Lot Tracking
- Bar Code Scanning
- Sales Order Fulfillment Process
- Serial or Lot Tracking
After going through these options, follow the steps mentioned below turn on the Advanced Inventory feature in QuickBooks Desktop Enterprise:
- First, go to the Edit Menu and click on the Choose Preferences option.
- Next, select the Items and Inventory option from the left panel.
- Click on the Company Preference option from the Items and Inventory drop-down menu.
- Then, tick the Inventory and Purchase Orders to activate them.

- After that, choose the Advanced Inventory Setup option.
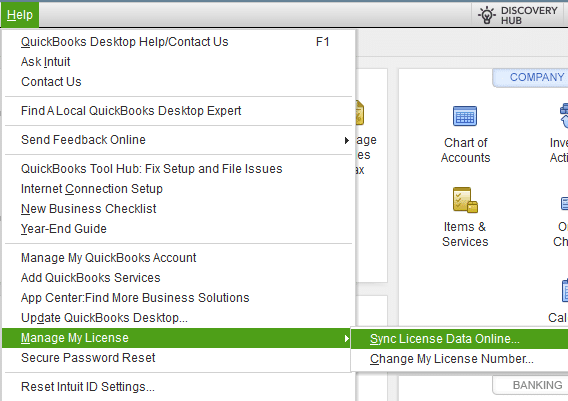
If you aren’t able to set it, synchronize the license data online so that QB can identify it. Perform the following steps to do it:
- Navigate to the Help menu and select the Manage My License.

- Then, select the Synchronize License the Data Online.
The Inventory in QuickBooks Enterprise is now active. It allows users to utilize its feature to add inventory in QBD.
How to Enable Inventory Management in QuickBooks Desktop?
Perform the step given below correctly to enable QuickBooks Desktop inventory management:
- Start by opening the Main Menu, then choose the Edit option from its drop-down.
- Next, select preferences based on your company’s requirements.
- After selecting the preferences, click the Item and Inventory option in the left panel.
- Then, return to the company preference tab and tick the option of Inventory and Purchase Orders are Active.
- Lastly, last on the OK option.
Inventory tracking is available in many versions of QBD, but in QBD Pro, the LIFO (Last In, First Out) and FIFO (First In, First Out) methods cannot be used to track inventory.
How to Set Up Inventory for Tracking in QuickBooks Desktop?
After creating inventory in QBD, you can conveniently track inventory according to your needs. Follow the steps discussed below:
- Initially, choose Items and Services from the Dashboard.
- Tap the item, then choose New.
- Next, choose the inventory part.
- After that, you have to enter all the essential details, such as the item’s serial number, name, etc.
- Then, tap the Income Account and choose the account to track the inventory item.
- Enter all the requested inventory item details.
- Last, Click on the OK Option.
How Can You Improve Your QuickBooks Desktop Inventory Management?
You should prioritize enhancing QuickBooks Desktop inventory management to boost profitability and optimize operations. Improve this crucial aspect by following the tips that we have mentioned below:
- Embrace inventory management tools and software to automate key processes. It is advised to implement automation to reduce errors and save time.
- You must use market trends, historical sales data, and sales projections to predict demand accurately. Follow this tip to avoid overstocking and stockouts.
- It is recommended to implement a JIT inventory system to reduce holding costs and eliminate excess inventory.
- You should build strong relationships with suppliers and negotiate favorable terms. Reduce supply chain disruptions by communicating promptly, monitoring lead times, and seeking alternative suppliers.
- You must conduct daily inventory audits to verify physical stock against recorded quantities.
- It is suggested to use RFID systems or barcoding to track inventory precisely in real-time. This reduces manual errors and ensures accurate stock counts.
- You should have optimal reorder points to activate timely replenishment orders. This ensures you have adequate stock to meet demand without overstocking.
Your business can achieve better inventory control, efficiency gains, and cost reductions by implementing these tips.
The QuickBooks Desktop Inventory — A Quick View Table
| Description | QBD has a built-in inventory management system that helps the company track stock levels, monitor inventory value, and manage purchases and sales efficiently. |
| Set up QuickBooks Desktop inventory | You can set up QuickBooks Desktop inventory by allowing the Inventory and Purchase Orders option under Edit > Preferences > Items & Inventory > Company Preferences. After activating it, you have to create new inventory items by selecting Inventory Part and entering the purchase, sales, and account details. |
| Tips to Enhance Performance | You can enhance QBD inventory performance by setting reorder points, automating procedures, and conducting day-to-day inventory audits. It is also recommended to use tools such as barcoding or Advanced Inventory (in Enterprise) for real-time tracking and enhanced warehouse organization. |
Conclusion
In this blog, we have detailed how to set up inventory in QuickBooks Desktop. We have also mentioned the tips to enhance the performance of the QuickBooks Inventory management. You should focus on improving inventory, as it increases profitability and optimizes operations. If you need any assistance with the QuickBooks Desktop inventory process, please contact our Accounting Helpline Experts at 1.855.738.2784.
Frequently Asked Questions
How to add inventory in QuickBooks Desktop?
You add inventory in QuickBooks Desktop by following the steps correctly mentioned below:
– Begin by navigating to Edit > Preferences.
– Then, choose Items & Inventory, then tap on the option of Company Preferences.
– Click OK.
– After that, go to List > Item List > Item > New.
– Next, select Inventory Part, enter item details (quantity, cost, accounts).
– Lastly, click OK to save.
Why is it essential for an e-commerce business to use QuickBooks Desktop Inventory?
E-commerce businesses must use QuickBooks Desktop Inventory to maintain inventory levels, prevent overselling, and align inventory values with financial reports.
Can I add new inventory in QuickBooks Desktop?
Yes, you can add inventory in QuickBooks Desktop by:
– Begin the process by navigating to the Menu.
– Next, open the list to choose the item.
– Select New, and then add all the information.
Why should I add inventory in QuickBooks Desktop?
You should add inventory in QuickBooks Desktop as it helps businesses avoid overstocking or shortages, track stock levels, and calculate the cost of goods sold (COGS). It helps with tax calculations, accurate financial records, and streamlines order management.
How can I start the inventory feature in QuickBooks Desktop?
You can start the inventory feature in QuickBooks Desktop by performing the steps mentioned below:
– First, tap on the Edit Preferences option.
– Then, choose the Corporate Preferences and Inventory Items.
– Finally, select the Checkbox option.
How can I fix the issue of negative inventory?
The negative inventory occurs when you sell items before recording their purchase. You can resolve this issue by entering the purchase (bill or invoice) with a date before the sale, or by running the Inventory Valuation Summary report to find discrepancies.
Related Posts-
Getting Rid of QuickBooks Error 1603: Error Causes & Fixing Methods
Cracking the QuickBooks Error 1324: A Guide to Success
Instant Solutions to the QuickBooks Error 3260 – Insufficient Permission Issue
QuickBooks Error PS036: Issue with Payroll Subscription
Is Your QuickBooks Update Stuck? Know How to Fix It!
QuickBooks Migration Error 1009 | All You Need to Know

Edward Martin is a Technical Content Writer for our leading Accounting firm. He has over 10 years of experience in QuickBooks and Xero. He has also worked with Sage, FreshBooks, and many other software platforms. Edward’s passion for clarity, accuracy, and innovation is evident in his writing. He is well versed in how to simplify complex technical concepts and turn them into easy-to-understand content for our readers.