
One common error that most QuickBooks users are aware of is the sending usage data error in QuickBooks Payroll. To complete the payroll tax filings, QB payroll users need to send the data to the payroll service, and this is where they face an error message: “QuickBooks has encountered a problem sending your usage data.” Once a user encounters this error, it interrupts the QuickBooks payroll connection with the online service. This error also appears when users try to update payroll, causing the process to halt. We understand how important it could be to file your taxes on time, and thus, we have prepared a step-by-step troubleshooting method to get you rid of QuickBooks sending usage data errors in the shortest time possible.
If you Need Quick Assistance from the QuickBooks Payroll Team to resolve the sending usage data error in QuickBooks, then Call Payroll Support Number 1.855.738.2784

What Causes Sending Usage Data Error in QuickBooks
The primary reasons behind users encountering QuickBooks sending usage data error are as follows:
- The time zone on your system is incorrect.
- You may have an accountant’s copy already created.
- Issues with the paychecks you have already sent Intuit may cause this error.
- An invalid security certificate may also trigger this problem.
- If you’re sending data in multi-user mode, this error can appear.
- A network time-out may block access to the server, causing the QuickBooks Sending Usage Data error.
- General internet connection problems are also behind this error.
- Internet security and personal firewall settings can trigger this issue.
- Internal errors or errors within the account can trigger this error.
- Browser issues when going to Intuit sites may cause this error in QB Online.
Solutions to Fix QuickBooks Error Sending Usage Data
Here’s how you can resolve the sending usage data error in QuickBooks:
Solution 1: Verify and Set the Date and Time on the Computer
The incorrect time zone is the primary contributor to the QB sending usage data error. So, checking and correcting it if it’s wrong is crucial to resolve the problem:
- Right-click the Windows Start menu and tap the Settings option.
- In the Settings menu, tap the Time & Language option.
- Navigate to the Date & Time tab within the Date and Time window.
- Click Change under the Change date and time section.
- Set the accurate date and time, and confirm the changes by selecting Change.
- Verify the adjustments by double-clicking the time in the notification area.
Steps to perform on Windows Vista and XP
- You can see the date and time at the bottom right side of your computer desktop, and in case you find any mistake in the date and time, double-click it and correct the information.
- If there is no option displayed to change the date and time, click the Start button and choose Settings.
- Under the Settings, select Control Panel and then click Date and Time.
- Under the Date and Time window, you need to select the Date and Time option.
- Now set the correct date and time and select the Time Zone tab.
- Set the correct time zone and move to the Daylight Saving option.
- Now, checkmark the Automatically adjust clock for daylight saving changes checkbox and click OK.
- Now go back to the desktop and check if the correct time and date are displayed.
Steps to Perform on Windows 7 and Windows 8
- Press Windows + R and type Control Panel in the Run window.
- Press Enter and select Date and Time.
- If you are using Windows 8, select Clock, Language, and Region and click Set the Date and Time.
- Now select Change date and time settings and click the Date and Time
- Click the Change date and time option.
- Now set the correct date and time and select the Change Time Zone tab.
- Select the Time Zone drop-down menu and select the correct Time Zone.
- Make sure to checkmark the Automatically adjust clock for the Daylight Saving Time checkbox.
- Hit OK twice.
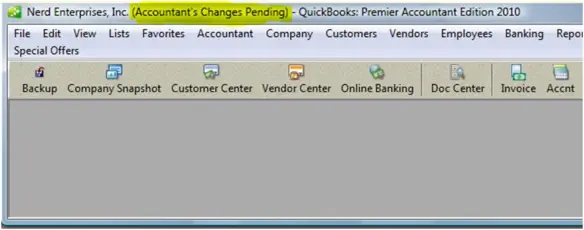
Solution 2: Look If the Title Bar Shows Accountant Changes Pending
If you notice “Accountant’s Changes Pending” in the QuickBooks Desktop title bar, it indicates that you are running an accountant’s copy of your file. It is essential to wait until your accountant returns the file, or you can remove the restrictions manually.
The manual process to remove the Accountant’s Copy restrictions is as follows:
- Navigate to the File menu and choose the Send Company File option.
- Hit Accountant’s copy, then select Client Activities.
- Choose Remove Restrictions.
- Confirm your decision by selecting Yes, I want to remove the Accountant’s Copy restrictions, and then hit OK.
However, it’s crucial to consult with your accountant before taking this step. Removing the restrictions will result in the loss of any changes made by your accountant. After resolving this, proceed to send your payroll data.
Solution 3: Remove and Recreate Paychecks Stuck as Online to Send
To enable the sending of usage data and receive payroll updates, it’s necessary to remove pending paychecks that are waiting to be sent. Follow these steps to identify online-to-send paychecks:
- Access Edit and then choose Find.
- Tap the Advanced tab. Access the Filter box, scroll, and choose the following options:
- Choose Detail Level from the Filter list in the Choose Filter section and hit Summary Only.
- Return to the Filter list and scroll down to tap Online Status, then click Online to Send.
- Select the filter Posting Status and the Either optionfrom the dropdown menu to the right.
- Tap Find in the top-right corner of the Find Screen window.
- If you come across any non-payroll transactions, ensure their processing is finished.
- If you locate paychecks, you will have to delete them. Ensure you print a copy of the paychecks before deleting them. Once the paychecks are removed, attempt to send zero payroll or usage data again. If the process is successful, try recreating the paychecks.
Solution 4: Try the Shortcut Keys
Using the shortcut keys will help you resolve the sending usage data error in QB:

- Press Ctrl + K.
- Select Edit, then Next.
- Hit Finish.
If this doesn’t fix the issue, move top the next troubleshooting solution.
Solution 5: Log in as Admin, Update QuickBooks, Review Paychecks, and Download the Latest Tax Table
You can try following the sequence of steps below to resolve the sending usage data error in QuickBooks:
- Close QuickBooks.
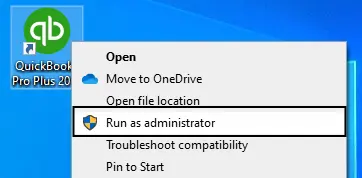
- Click the Windows menu on your PC. Type QuickBooks Desktop to search, right-click the QB Desktop program and select the Run as administrator option.

Run QuickBooks as an Administrator
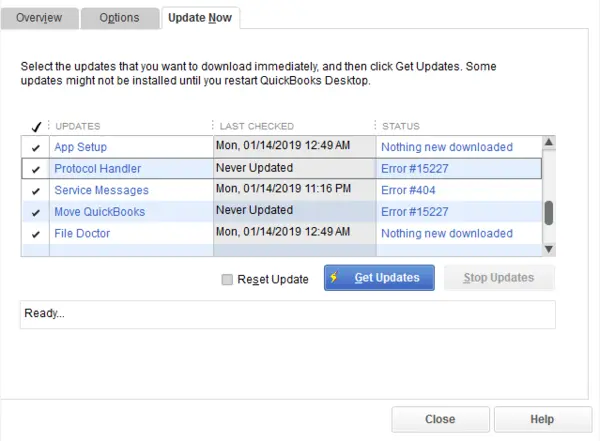
- Now, update QuickBooks Desktop to the latest version through the following steps:
- Tap Help in QuickBooks Desktop.
- Select Update QuickBooks Desktop.
- Hit Update Now.
- Then, click Get Updates and complete the installation of updates.

Update QuickBooks Desktop
- Instead of removing the uncheck paychecks, toggle them. It involves deleting the earnings items that you recently added to the Earnings section:
- Access the oldest stuck paycheck and hit the Paycheck Detail button.
- In the Review Paycheck window, within the Earnings section, include the same earnings item as the last one listed. For instance, if the last item is “Hourly Rate,” add another earnings item named “Hourly Rate” to the list.
- A Net Pay Locked message should appear; hit No. Ensure that tax amounts and net pay remain unchanged and click OK.
- If you are prompted with a Past Transaction message, hit Yes.
- Click Save & Close to exit the paycheck and hit Yes to the Recording Transaction warning message.
- Reopen the paycheck, click the Paycheck Details button, and remove the previously added earnings items from the Earnings section.
- Verify that tax amounts and net pay are unchanged, then click OK.
- Repeat these steps for each stuck paycheck identified in Step 2.
- Download the latest tax table updates of payroll as follows:
- Select the Employees section, then hit the Get Payroll Updates option.
- Tap Download Entire Update, then hit the Update option.
- Look for an information window which appears when the download is over.
- Now, let’s send the usage data in QB through the steps below:
- Tap Employees, then My Payroll Service, and click Send Usage Data. If this option isn’t available, follow the steps written below.
- Click Employees and then My Payroll Data.
- Hit the Send All option in the Send/ Receive Payroll Data window. Input the payroll service pin if it requests you.
You can update the payroll account information and ensure the sending usage data error doesn’t appear again.
Solution 6: Clear Cache
If you encounter the sending usage data error in QBO, you may need to check your browser for an overloaded cache. To eliminate the cache in Chrome:
- Hit the More icon in the upper right corner of the Chrome screen.
- Choose Settings.
- Scroll down with your mouse to the bottom of the page and click on Advanced.
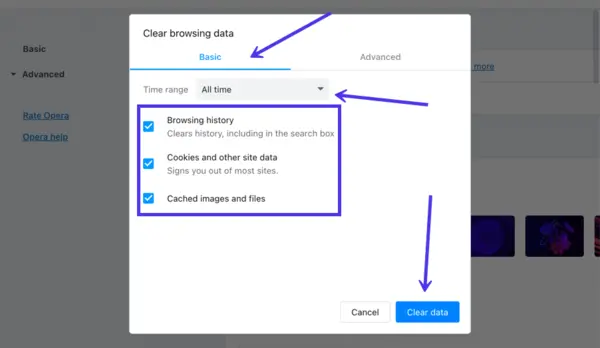
- Within the Privacy and Security section, tap the Clear browsing data option.
- Tick the box next to Browsing History.
- Hit All Time from the Time range drop-down list.
- Tick the box against Cached images and files.
- Hit Clear data.
In Microsoft Edge:
- Click on the three dots icon or More Actions and select Settings.
- Access the Privacy and Security tab.
- Next, hit the Choose what to clear option and specify the type of data you wish to delete, such as Browsing history, Download history, Cached images, files, etc.
- Finally, click the Clear button.
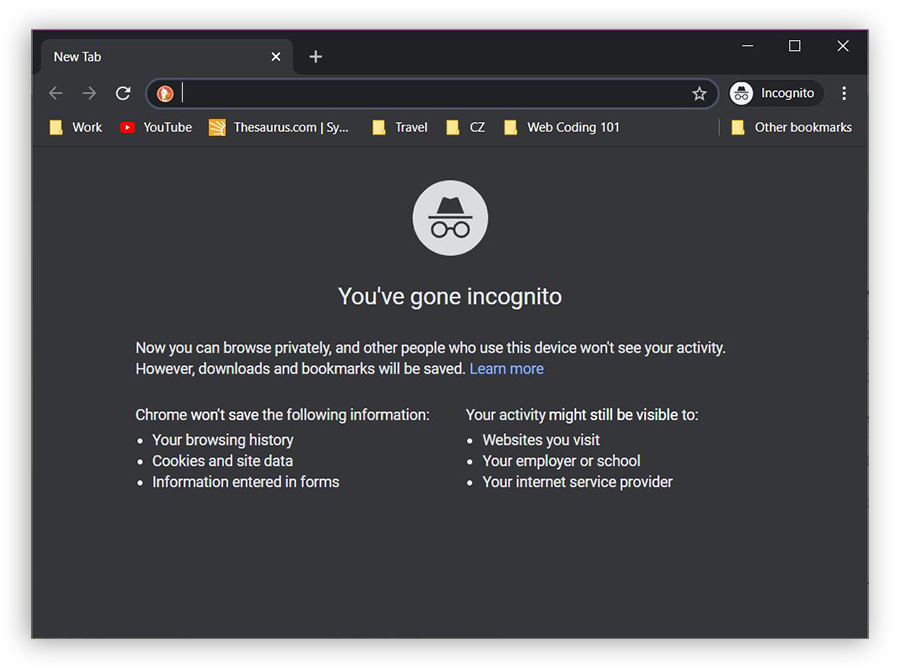
Solution 7: Use a Private Browsing Mode
A private browsing mode can help fix browser issues causing errors. You can use shortcuts like the following:
- Safari= Command + Shift+ N
- Microsoft Edge= Ctrl + Shift + P
- Google Chrome= Ctrl + Shift + N
- Mozilla Firefox= Ctrl + Shift + P
Solution 8: Add Intuit as a Trusted Site
You may need to add Intuit as a trusted site to resolve the browser problems causing the usage data error in QBO:
Include Intuit in Safari:
- Launch Safari and type payroll.intuit.com in the address bar.
- Press Enter.
- Click on Bookmarks and then choose Add Bookmark.
- From the dropdown, hit Top Sites under Add this page.
- Click on Add.
Include Intuit in Google Chrome:
- Click on the Customize and Control Google Chrome icon and hit Settings.
- In the left pane, hit Privacy and Security, and then click on Site Settings.
- Tap Cookies and site data.
- In the Allow section, tap Add.
- Enter *intuit.com and tap Add to save.
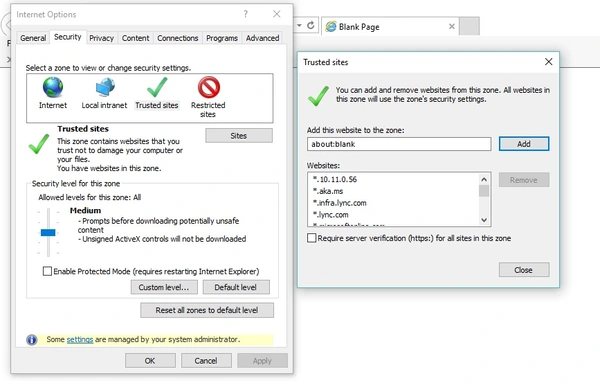
Include Intuit in Microsoft Edge:
- Navigate to the Control Panel.
- Open Internet Options.
- Choose Security.
- Hit Trusted Sites and then click on the Sites option.
- Enter *intuit.com and click Add to save.
- Select Close and then OK.
Solution 9: Meet System Requirements and Review the Info
Go over the details you entered in QB and ensure everything is in order. Then, log out and back in to reload the data. Double-check that everything is saved.
Then, meet the system requirements of your QB edition- QBO, QB Desktop, etc.
Solution 10: Access the QBWin.log file
Look for errors using the QBWin.log file to see what is causing the send usage data errors:
Accessing QBWin.log on a local computer can be done through two options:
Option 1: Access the QuickBooks Product Information screen
- On the Home page, use either F2 or Ctrl+1 to launch the Product Information window.
- Press F3 or Ctrl+2 to launch the Tech Help window, then navigate to the Open File tab.
- Tap QBWin.log and click Open File.
Option 2: Access QBWin.log in Windows
- Use File Explorer to go to the location of QBWin.log.
- Location: C:\Users\YOUR USER NAME\AppData\Local\Intuit\QuickBooks\log\XX.X\QBWin.log
- In this path, XX.X represents your QuickBooks Desktop version (e.g., 22.0 for Enterprise 22.0, 29.0 for QuickBooks 2019).
- Tip: Type %localappdata%\Intuit\QuickBooks\log\XX.X\QBWin.log in to the address bar for quicker access.
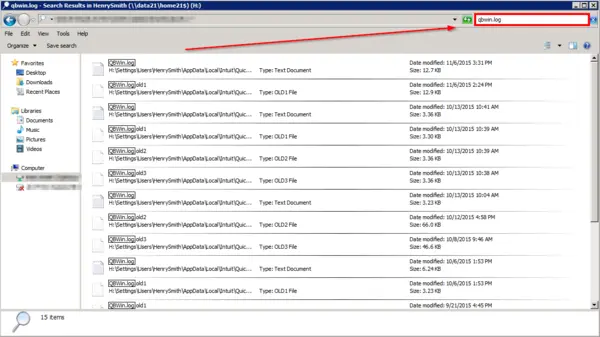
To access QBWin.log on Rights Networks or other Hosted Environments:
For QuickBooks Desktop Pro/Premier users:
- In your Hosted or Terminal environment, look for the Start menu and select Computer.
- In the search menu, type QBWin.log (without pressing Enter or clicking the magnifying glass icon).
- A list of QBWin.logs will appear, and you should identify the one with the latest timestamp.
For QuickBooks Enterprise Solution users:
- Use F2 or Ctrl+1 on the QuickBooks Home page to launch the Product Information window.
- Press F3 or Ctrl+2 to launch the Tech Help window.
- Navigate to the Open File tab, hit QBWin.log, and then choose Open File.
For QuickBooks Mac users:
- Choose File and then Close Company.
- Hold command+1 to view Product Information.
- Select Logging and then Collect All Logs.
- Access the zip file on your desktop and double-click it to extract the log files from the folder.
Bottom Line
As you can see, troubleshooting the sending usage data error in QuickBooks and payroll is not a complicated task, and you are only required to follow a few simple steps for a resolution. Still, if you are facing the same error and need the help of an expert, then you can reach us at our Payroll Helpline Number 1.855.738.2784.
FAQ’s
Which QuickBooks editions, browsers, and Windows OS encounter QuickBooks sending usage data error?
The sending usage data error in QuickBooks arises in the following editions:
1. QuickBooks Desktop Pro Enhanced
2. QB Desktop Payroll
3. Windows 10
4. iOS
5. QuickBooks Online
6. Microsoft Edge
7. QB Desktop Pro 2020
What are the scenarios when QuickBooks sending usage data error arises?
The QuickBooks sending usage data error arises as follows:
1. You may get this error even when you don’t run payroll along with error PS038.
2. Your payroll update continues to indicate a problem even when the subscription is up-to-date and doesn’t let you run the update.
3. You find difficulties running payroll and calculating taxes because of the unable to send the usage data error.
4. Your ability to handle payroll gets hindered because the payroll usage data fails to send to QuickBooks, and this failure is linked to the absence of an update in the Payroll Account Info. When attempting to update the Payroll Account data, an error stating that the timeframe for this update has expired, accompanied by error message 40003.
5. The QuickBooks send to usage data error arises but options for contacting support don’t.

Edward Martin
Edward Martin is a Technical Content Writer for our leading Accounting firm. He has over 10 years of experience in QuickBooks and Xero. He has also worked with Sage, FreshBooks, and many other software platforms. Edward’s passion for clarity, accuracy, and innovation is evident in his writing. He is well versed in how to simplify complex technical concepts and turn them into easy-to-understand content for our readers.