
If you have planned to move the QuickBooks company file to a new computer, this comprehensive guide will help you with stepwise instructions and also suggest crucial considerations that will help avoid data loss.
When you undertake a troubleshooting process, move your accounting data, or transfer files to another location on the same computer, the company files don’t transfer automatically. So, many questions may arise when you move QuickBooks company file to a new computer, including:
- Am I supposed to migrate, export, or use a backup file when I install QuickBooks on a new computer?
- If I move two company files in QuickBooks to a new computer, are they backed up separately or follow the same process?
If these are different questions, let’s learn how you can transfer files to another folder on your computer, on and off your network, and to another computer.
Are you looking for help transferring QuickBooks files from one new computer to another? Reach out to the QB experts at 1.855.738.2784, and find immediate assistance for your queries.

Steps to Move your Company File to another Computer
Here are the steps you need to undertake when you move your QuickBooks company file to a new location:
Situation 1: Moving the Company File to a Different Computer
Begin by learning how to create and restore QuickBooks backup file to a new computer as follows:
- First, you need to install QuickBooks Desktop on the new computer. Implementing this solution won’t affect your product license.
- Create a backup of your QuickBooks company file. Give a unique name to your file to ensure you don’t accidentally overwrite anything, and identification becomes easy.
- Save the backup file to a location where it is easily accessible.
- Move the backup company file to the new device. Plug an external storage device like a USB drive or an external hard drive or share it with the new computer if it is on the same network.
- Open QuickBooks on the new computer and restore the backup using the Open or Restore Company option under the File menu. Then, click Restore a Backup Copy > Next > Local Backup > Next. Browse the backup company file, preferably with a .qbb extension, and hit Open. Tap Save once done.
- If you use payroll, you’ll need to download the latest tax tables on your QB.
Situation 2: Moving the Company File to Another Location on the Same Computer
If you’re looking to move the files to another location on the same computer, you can implement the following steps:
- Firstly, form a backup of your company file by following the steps mentioned below:
- Go to the File menu in the QuickBooks Desktop. Switch to the single-user mode.
- Then, in the same tab, choose Back Up Company.
- Next, select Create Local Backup.
- Now, choose Local Backup in the next window and hit Next.
- When the Local Backup only section appears, browse to locate a particular location to save the backup file. Choose OK.
- Hit Save it Now and Next. You can also set automatic backups on a schedule by selecting the save it now and schedule future backups options.
- After creating the backup file, save it with a unique name for straightforward identification and to prevent accidental overwrites.
- The next step is saving the backup file to an accessible location. You need to know that if your computer is hosted on a network, store the file on a local hard drive rather than the network.
- Now, follow the steps to restore the backup to the new folder or location with a unique filename.
- Also, after the backup gets restored, you need to use the new file as the main company file. Renaming the previous company file and adding .old at the end of its name is a good idea to protect your data and know that it’s of no use anymore.
Learn to move custom templates and forms that don’t back up
The data from add-ons like Loan Manager doesn’t get backed up by QuickBooks. So, if this data is needed, you need to learn how to transfer QuickBooks company file to another computer separately. The steps are as follows:
- Launch the Start menu on the computer where you have restored the backup file.
- Now, open File Explorer and look for the folder named “Restored_[Your CompanyName]_Files.”
- Locate the files you wish to move to the folder. Now, copy and paste these files to the locations mentioned in the table below:
The file you wish to move Copy To (location) Cash Flow Projector (.cfp) [Company Name].qbw Loan Manager (.lmr) [Company Name].qbw Spell Checker (spell.ini and UserDictionary.tlx) C:\Program Data\Intuit\QuickBooks [version] QuickBooks Letters and Templates C:\Program Data\Intuit\QuickBooks [version]\QuickBooks Letter Templates Financial Statement Designer (FSD data) C:\Program Data\Intuit\QuickBooks [version]\Components\FSD\Data Financial Statement Designer (FSD clients) C:\Program Data\Intuit\Intuit\QuickBooks\Company Files\FSD\Clients Note: For Windows 7, the path is C:\Program Data\Intuit\
Business Planner (.bpw) [Company Name].qbw Printer Setting (PrintEng.ini, wpr.ini, and QBPrint.qbp) C:\Program Data\Intuit\QuickBooks [version]
Situation 3: Moving Complete QuickBooks Data Folder to a Different Computer
Next, learn how to copy the entire QuickBooks file to another computer with the following steps:
- Open QuickBooks Desktop application and press Ctrl + 1 or F2 on your keyboard to unlock the Product Information window and check out the location of QuickBooks data folder from the File Information section.
- Open File Explorer from the Start menu. Locate the folder with your company file.
- Click the folder and press Ctrl + C or right-click and press Copy on the keyboard.
- Now, paste the folder into your external drive.
- Plug the external drive into the new computer or the new location on your hard drive.
- Paste the QuickBooks folder to your new location.
You have successfully copied your entire folder. Feel free to transfer it to your new computer or any desired location on your hard drive. Next, launch QuickBooks and choose the option to open or restore an existing company. Locate the recently copied folder on your computer and open this company file.
Situation 4: Using IDP to Move the Company File
If your Intuit Data Protect plan supports the backup of your entire PC, then you can use it to migrate complete QuickBooks data to another computer.
- Create a backup of your QuickBooks data on your old computer.
- Log in to your IDP account and save the backup file to the online backup.
- Now login to your IDP account on the new computer and restore the backup from there.
When you learn how to transfer company files in QuickBooks Desktop, you also need to know the files that get transferred and restored through IDP:
Files in the QB data folder:
- Business Planner (.bpw) files (in QuickBooks Desktop Premier and Enterprise only)
- Transaction log (.tlg) files
- Network data (.nd) files
- Logos and images files
- Loan Manager (.lmr) files
- Cash Flow Projector (.cfp) files
Files and add-ons from other locations:
- QuickBooks Statement Writer (For Premier Accountant and Enterprise only)
- QuickBooks letters and templates
- Fixed Asset Manager
- Spell checker
- Printer setting (QuickBooks can recreate these files)
Situation 5: Move QB for Mac Files to QB for Windows
If you decide to switch from QuickBooks for Mac to Windows, you can convert your Mac company file to Windows using the following steps:
Step 1: Update QuickBooks for Mac
Ensure you’re using the latest release of QuickBooks by following the provided steps:
- Choose “Check for QuickBooks Updates” from the QuickBooks dropdown list.
- If a more recent version is found, click “Install Update.”
- Upon prompt, click “Install and Relaunch.”
- Once the update is over, QuickBooks for Mac will open automatically.
Step 2: Prepare Your QuickBooks for Mac Company File
Ensure your QuickBooks for Mac company file is ready. Remove memos exceeding 50 characters or containing special characters (!@#$%^&*).
- Locate memos with special characters using the Reports menu and Custom Transaction Detail Report.
- Choose All Dates from the Dates drop-down menu.
- Open transactions with memos by double-clicking them, deleting special characters, and saving changes.
- Close them and repeat for all transactions.
- Try re-sorting your lists.
- Go to File, select Utilities, then Verify Data.
Step 3: Transfer Your Company File to QuickBooks for Windows
Undertake company file transfer as follows:
- Log in to QuickBooks Mac as the admin.
- Go to the File menu, select Export, and choose To QuickBooks for Windows. If prompted to verify before backing up, select Verify.
- Name the file, choose a folder for saving, and select Save. Avoid using special characters in the file name.
- Enter and confirm your password, select OK, and then OK again.
- Move the file to your Windows computer, commonly done via USB flash drive, online storage, or email for smaller files.
- Restore the file in QuickBooks for Windows.
Additional Tips for Round-Tripping Your Data
- Pause QuickBooks updates until you receive your file back.
- Refrain from entering new data while your accountant works on your file to avoid any loss of records when you get the file back.
Situation 6: Moving Company Files Using QuickBooks Migrator Tool
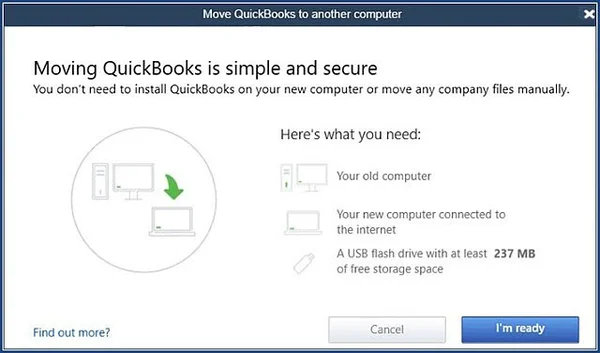
Using QuickBooks Migrator Tool is another approach that you can try to move the company files to a different computer. The Migrator Tool will work well if you use QuickBooks Desktop in single-user mode and not on the network. When you use the US version of QuickBooks Desktop 2018 or newer as a single user, the Migrator Tool can help move QB Desktop and up to three other company files to a new computer.
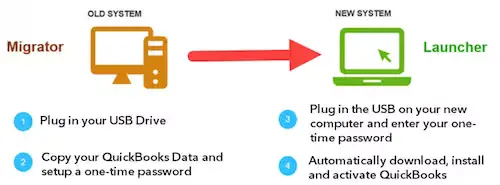
Step 1: On the Old Computer
- Navigate to the File menu in QuickBooks, choose Utilities, and then click Move QuickBooks to another computer.
- Select ‘I’m Ready‘ and generate a one-time password as instructed.
- Follow the prompts to use the USB flash drive. Wait for the file copying process to complete.
Step 2: On the New Computer
- Insert the USB flash drive. The Migrator Tool won’t open automatically due to Windows security restrictions.
- Access the flash drive to view its contents and double-click the file Move_QuickBooks.bat to initiate the migrator.
- Enter the previously created password and click ‘Let’s go.’
- Allow the Migrator Tool to finish the migration process.
Note: The duration will depend on your computer’s speed, internet connection, and the size of your company file(s).
Things to consider while you transfer QuickBooks files to a new computer through the Migrator Tool are as follows:
- You need to form a complex and strong password to lock and unlock everything you copied from the previous desktop. Also, write this password somewhere secure because it will be used only once in a while using the Migrator Tool.
- The Migrator Tool can copy the last three company files you opened and their supporting files to a USB flash drive.
- The USB drive is used to move QuickBooks company files, whereas the Migrator Tool handles the technical aspect.
- You won’t have to worry about downloading QuickBooks Desktop as the tool does it automatically. It will set up the correct version on the new computer with your files.
- Your file won’t get reformatted. Similarly, nothing will get erased.
- You need to note that the 64-bit QuickBooks files can only open and migrate to 64-bit Windows OS. The migrator tool might not work if it runs on 32-bit Windows with 64-bit files.
IMPORTANT: For detailed instructions on moving QuickBooks Desktop installation to a new computer, follow our article on How to Move QuickBooks Desktop to a New Computer.
Conclusion
Sometimes, users face issues after moving data to another computer and this happens when some important QuickBooks files are not copied to the other computer, which is common. If you are also dealing with errors and difficulties while trying to move QuickBooks company file to a new computer, then you can get direct support from Certified Desktop Experts at 1.855.738.2784.
FAQs
What will be needed while using the migrator tool to Move QuickBooks Company File to a New Computer?
When you move QuickBooks files from one computer to another, you’ll need to ensure the following:
1. A stable internet connection for seamless transfer in both new and old computers.
2. A USB flash drive with adequate space to hold all the QB files. The Migrator Tool will convey the space you need for the files, usually between 150- 250 MB.
Should I inform Intuit about moving QuickBooks company files to new computer?
No, there’s no need to let Intuit know about moving the company file to a new computer.
If I move two company files in QuickBooks to a new computer, are they backed up separately or follow the same process?
There will be two separate backups for different companies.
Will the new installation update the license information automatically?
You should be able to access your Customer Account Management Portal (CAMPs) as the primary contact so you can locate your license code.
If I have to hand over my client’s accounting details to another bookkeeper, how can I ensure my QuickBooks license information won’t be passed on to them?
There’s no need for you to give your QuickBooks license details to another bookkeeper. Instead, you can remove the password from your company file and then generate backups:
1. Go to the Company tab and choose Set up Users and Passwords.
2. Enter the current password in the Change QuickBooks Password window.
3. Leave the New Password and Confirm Password fields empty.
4. Navigate to the challenge question and tap the Select option, leaving the answer field blank.
Afterward, click OK.

Edward Martin
Edward Martin is a Technical Content Writer for our leading Accounting firm. He has over 10 years of experience in QuickBooks and Xero. He has also worked with Sage, FreshBooks, and many other software platforms. Edward’s passion for clarity, accuracy, and innovation is evident in his writing. He is well versed in how to simplify complex technical concepts and turn them into easy-to-understand content for our readers.