You might already be aware of hosting QuickBooks in the cloud that is the most powerful and scalable way to access your QuickBooks data from anywhere in the world on any device. Cloud hosting has several benefits and advantages over traditional hosting like anytime, anywhere access, multi-user collaboration, automated backups, reduced IT cost, advanced security, scalability, and super-fast storage. Here in this article, you will find everything you need to know about hosting QuickBooks in the cloud plus some important consideration for QuickBooks cloud hosting.
Need Help Setting up QuickBooks in the Cloud? Call Cloud Hosting Support 1.855.738.2784 for Best QuickBooks Hosting Solutions
Requirements for Setting up QuickBooks in the Cloud
Utilizing QuickBooks multi-user mode after setting up your QuickBooks Desktop in the cloud, you can add up to 30 users to work on the company file. This means your accountant can complete any task in QuickBooks without even stepping into the workplace even on Saturday mornings. Let’s discuss the preconditions for setting up QuickBooks Desktop cloud hosting.
- A subscription to QuickBooks cloud hosting service that will provide you an online cloud space to install and run QuickBooks Desktop on the virtual servers.
- A working internet connection.
Steps to Setup QuickBooks in the Cloud
Step 1: Get QuickBooks on the Virtual Machine
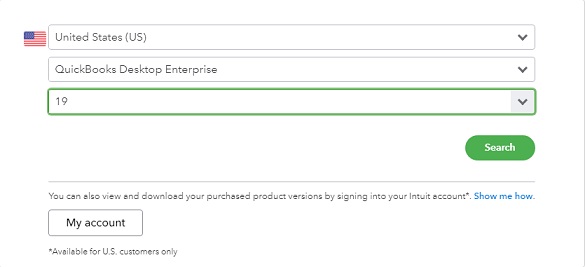
- Visit the QuickBooks Product Download page and select the Country, Product, and correct Product Version from the drop-down lists.

QuickBooks Choose Product Page
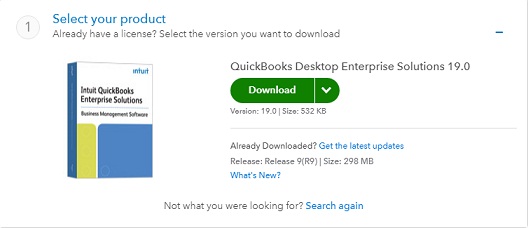
- Click Search and then hit the Download button.

QuickBooks Product Download Page
- Open the downloads and double-click the QuickBooks installer.
- On the Choose your Installation Type window select Custom and Network options and click Next.
- Now from the Custom and Network Options choose “I will not be using QuickBooks on this computer. I will be storing our company file here so it can be shared over our network.” and click Next.
- After the installation, click Open QuickBooks.
Step 2: Set up QuickBooks Company File
- After the installation, navigate to the C drive of your computer.
- Create a new folder and name it QuickBooks.
- Place the company file inside the folder.
- Right-click the folder and from the Share with options select Specific People.
- If you want to share the company file with everyone, then choose everyone and click Add.
- If you want some specific users to have the access of QuickBooks company file, then type the name of the user and click Add.
- Now choose the read/write permissions for the user from the drop-down under the Permission Level.
- Click Share and enter the administrator login credentials when prompted.
- Now right-click the QuickBooks folder that you have created in the C drive and go to the Properties.
- From under the Sharing tab look for the Network Path.
- Note down the network path to access the company file data.
- Now open the File Manager of your computer and click Map Network drive from the top.
- Enter the path to the shared folder in the Folder text box and click Finish.
- Now enter the login credentials to access the company file and click OK.
Step 3: Install QuickBooks Desktop on Clients Machine
- Download the QuickBooks installer on the workstation and run the QuickBooks setup file.
- From the Custom and Network options select I’ll be using QuickBooks on this computer and click Next.
- One the installation is completed click Open QuickBooks.
- Follow the instructions to complete the product registration process.
- Now from the No Company Open window select Open or Restore an Existing Company File.
- Open the network drive and select the company file.
- Click Open and then hit Yes if you want to set up other users to access the company file in the network.
Hopefully, after following all the steps mentioned in this article, you have successfully set up the QuickBooks in the cloud. In case if you are facing any issues while hosting QuickBooks in the cloud, then you can always reach us at our Cloud Hosting support at 1.855.738.2784 for immediate help and assistance.

Edward Martin
Edward Martin is a Technical Content Writer for our leading Accounting firm. He has over 10 years of experience in QuickBooks and Xero. He has also worked with Sage, FreshBooks, and many other software platforms. Edward’s passion for clarity, accuracy, and innovation is evident in his writing. He is well versed in how to simplify complex technical concepts and turn them into easy-to-understand content for our readers.