
Users today are reporting QuickBooks missing PDF Component errors while using the PDF and printing feature in QuickBooks. Printing errors in QuickBooks are quite common, and every once in a while, QuickBooks users come across one of these errors. One such glitch that frustrates users arises while printing PDF files from QuickBooks. Whenever a user tries to print a PDF, QuickBooks throws an error message: “QuickBooks detected that a component required to create PDF files is missing.”
The error message might confuse users, as it does not explain which component is missing and what should be the next step to resolve the error. This article will clarify the reasons that trigger QuickBooks PDF Component missing error and, of course, the troubleshooting. So follow the complete article to know all about QuickBooks PDF printing errors.
The steps listed in this blog are easy to follow. But, it won’t always guarantee resolution. To top this up, we cannot stress enough that an error while printing PDFs is linked to internal data. Therefore, any mistake on your part can lead to data being swiped away. A wiser step lies with calling support at 1.855.738.2784.

What is the QuickBooks Missing PDF Component Error?
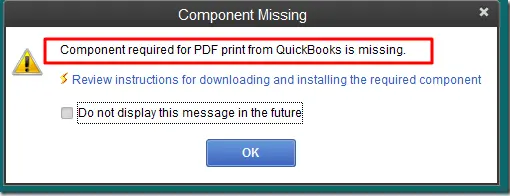
Sometimes, QuickBooks users face troubles while they are converting their files into PDFs or while they print them. For example, an error message reads, “QuickBooks detected that a component PDF is missing.” Such error messages can cause panic among users as it doesn’t specify which component is missing. Also, it makes it challenging to realize the root trigger of the error. However, there isn’t much to worry about with our detailed blog that specifies the reasons and corresponding troubleshooting solutions for you to implement and resolve the QuickBooks missing component PDF error.
Possible Causes of the “Component Required for PDF Print from QuickBooks is missing” Error
The following could be the possible reasons for getting the message, “QuickBooks detected that a component required to create PDF is missing.”
- Damaged, missing, or outdated Adobe Reader.
- Outdated QuickBooks Desktop application.
- Microsoft XPS Document Writer (MXDW) is turned off in Windows settings.
- An obsolete QB version..
If you find none of the above causing the missing PDF component QuickBooks, you should try other troubleshooting methods to fix the problem or reach out to the QB experts.
List of Other Possible PDF Errors
Several other printing and PDF issues might accompany the QuickBooks cannot complete the current action due to a missing component PDF message. These include:
- There is a problem connecting to your chosen printer, Microsoft XPS Document Writer, on the XPS port.
- Unable to save as .PDF file.
- Error 1722 or 1801 might arise when installing PDF Converter.
- It could not print to the printer.
- Problems printing transactions or reports.
- Printing directly to the QuickBooks PDF Converter is not possible.
- Unrecoverable error.
- Print Driver Host for 32-bit Applications is not Working.
Solutions for QB Missing PDF Component
Here’s what you need to do to get rid of QuickBooks missing PDF component Windows 11 error:
Resolution 1: Update QuickBooks Desktop to the Latest Release
Most of the time, updating QuickBooks will get rid of most of the PDF printing errors. For detailed instructions, follow our article in How to Update QuickBooks Desktop. If QuickBooks can’t complete the current action due to a missing component PDF even after the update, follow the subsequent suggested resolution.
Updating QuickBooks from outside the application
- Visit the QuickBooks Download and Update webpage and select the QuickBooks version you are using from the Select Product drop-down list.
- Select the QuickBooks version from the Select Version drop-down list and hit Search.
- Click Get the Latest Updates and select Save to download the file on your desktop.
- Double-click the downloaded file to proceed with the installation
Updating QuickBooks from within the application
- Open QuickBooks Desktop and select Close Company or Logoff under the File tab.
- Click Exit from the File tab.
- Right-click the QuickBooks icon from your desktop screen and hit Run as Administrator.
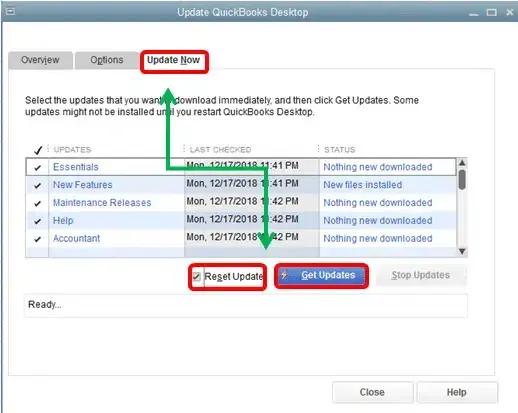
- Select Update QuickBooks from under the Help tab.
- Under the Options menu, click Mark All and hit Save.
- Under the Update Now menu, click Reset Update and then hit Get Updates.
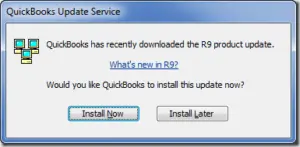
- Restart QuickBooks and click Yes on the install updates confirmation box.
Resolution 2: Update/Repair Adobe Acrobat Reader
Problems with your Adobe Acrobat Reader, like it is outdated or damaged, can lead to QuickBooks has detected that a component PDF message. You need to update the obsolete app or fix the damage as follows:
Steps to install Adobe Acrobat Reader
- Click the start button on your desktop and type Adobe in the Search Programs and Files search box.
- Select Adobe Reader from the top of the list.
- Select Check for Updates from under the Help tab.
- You can visit the Adobe Product Download Page to download the setup file for installation manually.
- Follow the instructions in the Adobe installation guide.
Steps to Repair Adobe Reader
- Exit all the open windows and web browsers on your computer.
- Press the Windows + R key on your keyboard and type appwiz.cpl in the Run window text box.
- Double-click Adobe Reader from the list and select Uninstall / Change.
- Click Next and then Repair.
- Hit Next again, and then choose Install.
- Click Finish after the installation and restart Windows.
- Follow the next troubleshooting step if you are still not able to print PDF from QuickBooks because of a missing component error.
Resolution 3: Turn On Microsoft XPS Document Writer
Many users might not realize that their Microsoft XPS Document writer is off. It might lead to the PDF component missing QuickBooks. Resolve it as follows:
- Press Windows + R and type appwiz.cpl in the Run window.
- Press Enter and click Turn Windows features on or off from the left side panel.
- Check if the checkbox beside the Microsoft XPS Document Writer is marked; if not, select the box and try to print PDF from QuickBooks again.
- Follow the link for more information about Microsoft XPS Document Writer.
Resolution 4: Utilize QuickBooks Print and Print Repair Tool
When QuickBooks cannot complete the current action due to a missing component error strike, you can utilize the tool hub to fix this problem.
Step 1: Download and install QuickBooks Tool Hub
- Find the download link for QuickBooks Tool Hub on the internet from official sources.
- Click it and save the file in the default location.
- You can also browse and change the file of the downloaded location for easy access.
- Once the download is done, head back to the folder where you saved the file.
- Locate the QuickBooksToolHub.exe file and double-tap it.
- It will begin the installation with prompts appearing on the screen.
- Follow all of them step-wise and adhere to the terms and conditions.
- After the installation finishes, you can double-click the QuickBooks Tool Hub icon on the desktop to open and fix the QuickBooks can’t complete the current action error.
Step 2: Print and Print Repair Tool
- Open the QuickBooks Tool Hub.
- Access the Program Problems section.
- Choose the QuickBooks PDF and Print Repair Tool. It will take around a minute or so to run.
- Now, attempt to save your PDF, print, and email. Check the next solution if QuickBooks cannot complete the current action.
Resolution 5: Reset the temp folder permissions
Undertake this solution through the following steps:
Step 1: Reset your temp folder permissions
Try rebooting your device and checking back when you get the missing PDF component QuickBooks desktop error. If it doesn’t work, you’ll have to reset the permissions for your TEMP folder as follows:
- Launch the Run command by pressing the Windows and R keys together.
- Type the words %TEMP% in the run search field and hit Enter.
- In the empty area of the temp folder, right-click and hit the Properties option.
- Move to the Security tab.
- You need to set all user names and groups appearing on the security tab as Full Control.
- After setting the permissions to Full Control, save it as PDF within the QuickBooks application. Hopefully, you’ll resolve the missing components in QuickBooks desktop.
Step 2: Validate that you can print to XPS (for issues with PDF and Email)
You need to confirm that you can print to your XPS Document Writer. QuickBooks utilizes parts of the XPS Document Writer to save as PDF.
- Access your Notepad when you see QuickBooks desktop missing PDF component.
- Type Test, go to File, and choose Print.
- Choose the XPS Document Writer and hit the Print option.
- Give a name to the file and save it to the desktop.
- Get back to your desktop and see the XPS document you printed from the notepad.
Some Important Considerations-
- Test the print issues by printing to your printer. Verify if the print is successful outside QuickBooks.
- If you are finding it challenging to print to the XPS printer outside QuickBooks, you’ll need to contact professionals for help. XPS printer is not a QB product.
Resolution 6: Test, adjust, and reinstall permissions for XPS Document writer (Users using Windows and not terminal services)
Consider the following points before proceeding with the solutions:
- Intuit doesn’t support Microsoft apps. So, they are not responsible for these tools if they cause QuickBooks cannot complete the action due to a missing component error.
- When you cannot perform these tasks yourself, consider consulting IT professionals.
Step 1: Test the XPS Document Writer and Print Outside QuickBooks
The steps involved in this solution are as follows:
- Go to the File menu and choose Print.
- Choose the Microsoft XPS Document Writer from the printer list in the print window. Hit the Print option.
- Now, save the file with the .xps extension to the computer’s desktop.
- Navigate to the desktop and find the .xps file:
- When you find the .xps file, try opening it. If an error emerges when you open the file or it doesn’t appear right, you’ll need to reinstall the XPS Document Writer.
- If there’s no file and no error appears while saving, there may be an issue with the security settings. You may not be able to print, and it might have deleted the .xps file after creation.
- When you see a problem when you try printing or if you don’t see the XPS Document writer, you’ll have to install the printer again.
Step 2: Reinstall Microsoft XPS Document Writer
For Windows 8:
- Go to the Start screen > Settings > Control panel > Devices and Printers.
- Next, choose the Microsoft XPS Document Writer icon. Further, hit the Remove device option.
- Select Yes to confirm.
- Choose the Add a printer option from the toolbar.
- Next, Add a local printer or network print with manual settings.
- Select PORTPROMPT: (Local port) and hit Next in the Use an existing port.
- Choose Microsoft from the manufacturer list. Then, Microsoft XPS Document Writer v4, followed by Next.
- Choose the Replace the current driver option. Then, Next.
- Take the v4 out of the Microsoft XPS Document Writer name in the printer name field.
- Hit Finish and uncheck the box, making XPS the default printer if you want.
For Windows 7/ Vista:
- Search for Devices and Printers from the Windows Start menu,
- Choose Microsoft XPS Document Writer, followed by Remove Device.
- Hit Yes to validate the decision.
- Select Add a printer from the toolbar. Choose to Add a local printer.
- Choose to Use an existing port option.
- Select XPS Port: (Local Port), and hit Next.
- Hit Microsoft from the manufacturer list. Then, choose Microsoft XPS Document Writer v4, followed by Next.
- Choose Replace the current driver, then Next.
Conclusion
There is still a possibility that even after applying all the solutions, you might get the Component Required for PDF Print from QuickBooks is missing message, and to fix the issue, we might need to take a closer look at the error on your system. If you are one of the users still facing the error, get in touch with us and call Error Support Number 1.855.738.2784 to establish a support connection with us for a quick solution.
FAQs
What to do if the missing PDF component in QB is causing the file not to get saved in QuickBooks?
When you cannot save the PDF file in QuickBooks, try checking the storage settings:
1. Launch the PDF file with Adobe Acrobat
2. Visit the Edit menu, followed by Preferences.
3. Move to the General option.
4. Uncheck the box that says Show Online storage when you save files.
5. Save the settings by clicking OK at the bottom.
It will now allow you to save the PDF file in QB.
How can we fix the QuickBooks missing PDF Component error?
You can try the following solutions to resolve the QuickBooks missing PDF component error:
1. Check if the XPS services are enabled
2. Make the required adjustments to the Windows user permissions for the XPS Document Writer
3. Edit the security software settings
4. Install or fix the MSXML 6.0
5. Form a new template for your form
6. For Terminal Services only, bypass the print spooler
When does the QuickBooks Missing PDF Component Error Emerge?
The QuickBooks Missing PDF Component error arises when you endeavor the following tasks:
1. Opening, editing, or using PDF Files
2. Printing PDF Files
3. Developing, emailing, or printing a payroll report
Why is My QuickBooks missing a PDF component?
Users face QuickBooks missing a PDF component error due to the following causes:
1. Outdated QuickBooks Desktop application.
2. Problems with Adobe Acrobat Reader.
3. Disabled Microsoft XPS Document Writer.
Which tool should we use to resolve the QuickBooks installation errors missing component?
When problems regarding installation cause PDF missing component warnings, employ the QB Install Diagnostic tool from the tool hub. Installation issues is the tab to access this tool.

Edward Martin
Edward Martin is a Technical Content Writer for our leading Accounting firm. He has over 10 years of experience in QuickBooks and Xero. He has also worked with Sage, FreshBooks, and many other software platforms. Edward’s passion for clarity, accuracy, and innovation is evident in his writing. He is well versed in how to simplify complex technical concepts and turn them into easy-to-understand content for our readers.