
QuickBooks error 6144 82 is a common 6XXX series error that can occur when you try to open a company file, be it over a network or locally. If you are unable to access your company file due to error code 6144 82, keep reading this blog for troubleshooting insights.
We all know that the company file is one of the crucial elements in QuickBooks, as it stores all the financial info of a business. Thus, problems accessing the company file because of an error like QuickBooks Desktop error 6144 82 creates panic, and an immediate resolution becomes a serious concern. When it comes to error code 6144 82, company file corruption and network setup issues are some of the main triggers. To help you resolve this error code in the best way possible, we have curated this detailed guide with major reasons and practical solutions. So, let’s read further and find out how to regain access to your company file in no time.
With this detailed guide, we aim to address all your company file access problems. However, if you want an expert to resolve the issue on your behalf, you can reach out to our team of QB experts at 1.855.738.2784 for immediate guidance in resolving QuickBooks error 6144.

Main Reasons Why QuickBooks Error Code 6144 82 Occurs
Opening a company file in QuickBooks seems to be a simple operation, but several components work in the background simultaneously to help you access the file. If any of these supporting components or services start acting up due to corruption or damage, QuickBooks starts throwing error messages. Thus, to better understand QuickBooks error message 6144 82, you need to learn about its various triggers. Below, we have mentioned the main reasons why this company file error arises in QuickBooks.
- The network is incorrectly set up while accessing the company files in QB.
- Essential QB files, like the Network Data and Transaction Log files, might be damaged or corrupted, which can cause issues while opening the company files in a network or multi-user mode.
- Your QuickBooks Desktop is not updated to the latest release, and the current version might be incompatible with running the company files.
- If the company file name exceeds the limit of 65 characters, error 6144 82 in QuickBooks Desktop may occur.
- The company file you are trying to access may have been moved to a different folder location.
- General company file corruption and connectivity issues can also trigger QuickBooks enterprise error 6144 82.
- Your QuickBooks Desktop app might not be correctly installed, and the installation files might be damaged, broken, or corrupted.
- You have insufficient folder permissions to access or share the company files, which can be another prominent reason for the file access issues.
- The Windows firewall or an antivirus app might be configured to create blockages when opening company files in QB.
NOTE: If you are getting the error while accessing the company file stored on cloud storage, you must consider moving it to the local storage of your workstation or the server. Experts also suggest to backup your company file before troubleshooting to avoid accidental data loss.
As you are now aware of the reasons that can cause QuickBooks error 6144 82, let’s jump on to the troubleshooting methods to quickly diagnose of the error.
General Solutions to Fix QuickBooks Desktop Error 6144 82
Since it is crucial to resolve QB error code 6144 82 to access the company files successfully, you need to learn about the various troubleshooting methods involved. Once you have understood the reasons behind the error, you can better implement the solutions provided below to tackle the error effectively.
Solution 1 – Update QuickBooks Desktop
It is imperative to update QuickBooks Desktop to ensure that the software is free from bugs and loopholes that might cause issues. Updating QuickBooks can also help get rid of any general issues that might lead to QuickBooks company file error 6144 82. Therefore, let’s update the software to the latest release in the following manner –
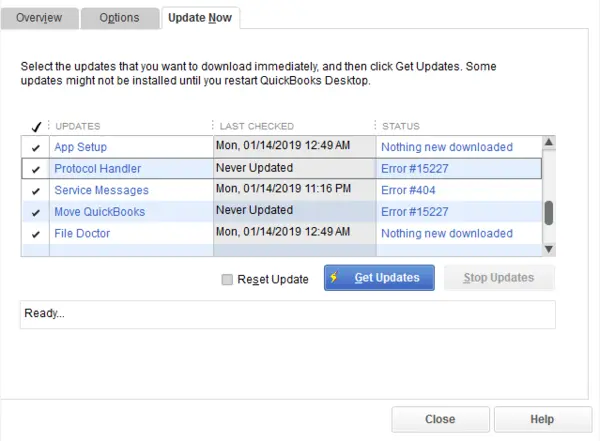
- Open QuickBooks, go to the Help tab[1] , and choose Update QuickBooks Desktop.
- Select Update Now, then select the Reset Updates checkbox and click the Get Updates button.
- Lastly, close and reopen QuickBooks and click Install Now to install the updates in the software.
Once QB is updated, restart the system, open QuickBooks, and try accessing the company file to check whether the issue persists. If it does, move to the next solution.
Solution 2: Run QuickBooks File Doctor Utility
Since company file corruption and network issues are the main reasons for QuickBooks error code 6144 82, you can use the QuickBooks File Doctor Tool to fix these issues in the following manner –
Step 1 – Download QB Tool Hub
The QuickBooks Tool Hub is an essential utility that can help fix common errors in QB. You can download and install QB Tool Hub with these steps –
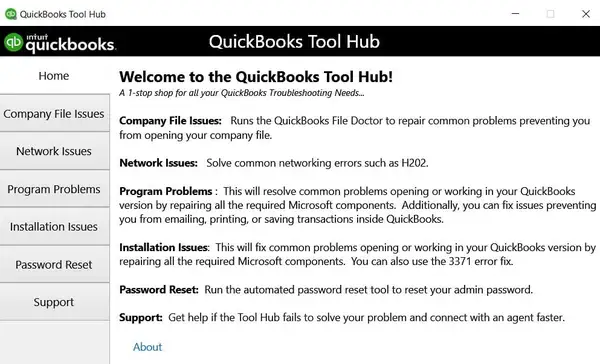
- First, download the most recent version of the QuickBooks Tool Hub, then save the file at an accessible location on your PC so you can easily find it.
Note: If you have already installed the QB Tool Hub, you can find out its current version at the bottom of the Home tab. - Now, open the QuickBooksToolHub.exe file you have just downloaded and follow the on-screen prompts to run the installation process.
- Agree to the terms and conditions, and when the installation finishes, double-click the icon on your Windows desktop to open the QuickBooks Tool Hub.
Note: If you are unable to locate the QB Tool Hub icon, you can manually search “QuickBooks Tool Hub” in the Windows search bar and access the program.
Once the tool hub is installed, you can run the Quick Fix My File tool in the next step.
Step 2 – Run the Quick Fix My File Tool
Before running QuickBooks File Doctor, you can run the Quick Fix My File tool from the QB Tool Hub to fix general company file problems in the following manner –
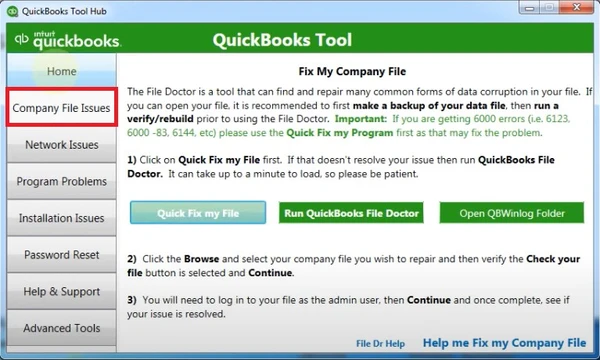
- Select Company File Issues from the QuickBooks Tool Hub, then choose the Quick Fix My File tool.
- Let the tool run; when the process is complete, hit OK and relaunch QuickBooks.
Now, try opening your company file to check whether error code 6144 82 in QuickBooks has been resolved. If the company file error still persists, move to the next step and use the QuickBooks File Doctor Tool.
Step 3 – Use QuickBooks File Doctor
The last step is to run the QuickBooks File Doctor Tool, as this utility helps fix the company file and network issues that might trigger error code 6144 82 in QuickBooks. You can run this tool effortlessly by following the steps below –

- From the Tool Hub, go to the Company File Issues tab and select Run QuickBooks File Doctor.
Note: The tool might not open instantly. Precisely, it may take up to a minute to open. However, if the QuickBooks File Doctor doesn’t open, you can manually search for “QuickBooks Desktop File Doc” in your Windows search bar and open the utility. - In QuickBooks File Doctor, select your company file from the drop-down menu or select Browse and Search to find the file you want to repair.
- Select the Check your file and Network option, then hit Continue and enter your admin credentials.
- Select Next and initiate the scan process, then reopen QuickBooks to access the company file once the process is complete.
Note: The company file scan process might take up to 10-15 minutes, as it depends on your file size. After the process ends, the scan may say it was unsuccessful, even if it fixes your issue.
Now, the next step is to access the company file and check if the error has been fixed. If the error code persists, move to the next troubleshooting solution.
Solution 3: Rename the Company File
As suggested by Intuit, the company file name must be under 65 characters and not contain any special characters. Make sure your company file name does not break the guidelines. If you suspect it does, rename the company file by making the required changes in the following manner.
- Using Windows Explorer, go to the QuickBooks company file folder, which is usually located at C:\Users\Public\Public Documents\Intuit\QuickBooks\Company Files.
- Right-click the company file with .QBW extension and select Rename.
Make the required changes to adhere to the character limit and try to open the company file once again. If you are still getting QuickBooks Desktop error 6144 82, then follow the next troubleshooting method.
Solutions for QuickBooks Error Code 6144 When You Open the Company File Locally
QuickBooks error 6144 82 can occur while opening the files on the same computer where Quickbooks is installed. If you are experiencing trouble opening the file on the same PC, follow the troubleshooting solutions given below to rectify the error.
Solution 1: Rename .ND and .TLG Files in QuickBooks Installation Folder
Corruption in the QuickBooks Network Data and Transaction Log files is one of the most prominent reasons for getting QuickBooks error code -6144, -82. When you rename these files, QB will again recreate them when you scan them with the QuickBooks Database Server Manager. To successfully rename the .ND and .TLG files, follow these steps –
- Open QuickBooks, press F2 to get the Product Information window, then access the File Information section.
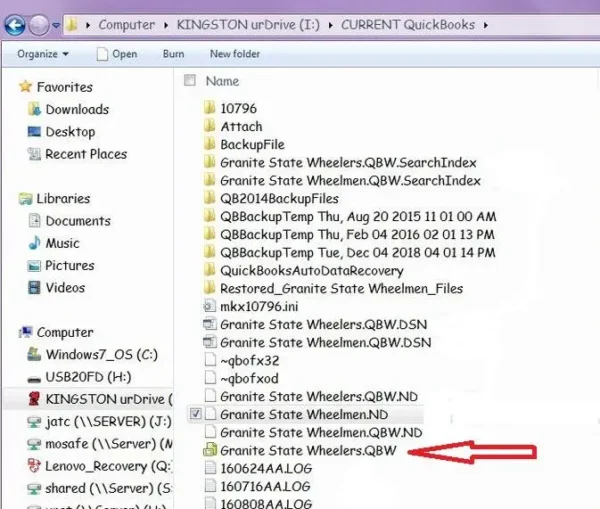
- Note down the location of the company file, then open Windows File Explorer and go to your company file folder.
- Locate the files with .ND and .TLG extensions that have the same file name as your company file. (For example, company_file.qbw.nd / company_file.qbw.tlg).
- If you can’t see the file extensions, then you will first need to make some changes to the Windows Files and Folder settings as follows –
Note: This step enables hidden files and folders for Windows 10 users. If you use another Windows variant, you need to perform these specific steps to enable the file and folder settings.- Open File Explorer, then select View and click the Options tab.
- Select Change Folder and Search options, select the View tab, and go to the Advanced Settings section.
- Select Show hidden files, folders, and drives, then hit OK to save the changes and locate the .ND and .TLG files.
- Right-click each file, select Rename, and add “.OLD” at the end of each file name (example: company_file.qbw.nd.OLD).
- Once done, rerun QuickBooks and sign in to your company file to check the status of the 6144 error code.
If the error keeps appearing, move to the next solution to eliminate the company file access issues.
Solution 2: Open a Sample Company File in QB
By opening a sample company file, you can test if the problem is with your company file or with QuickBooks Desktop. If a sample company file doesn’t open and instead gives you an error, it indicates problems with your QuickBooks installation. You can open a sample company file in the following manner –
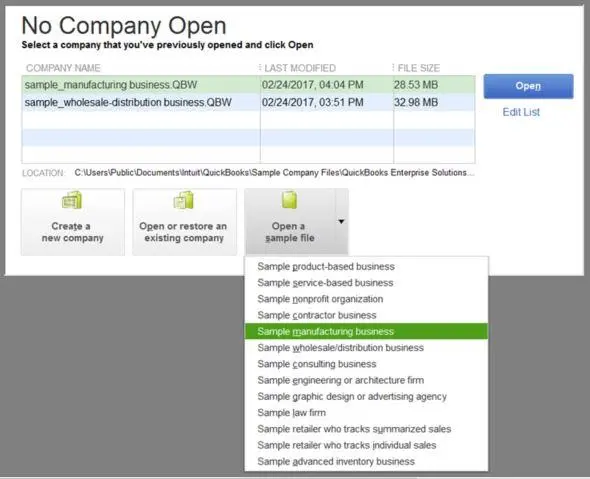
- Double-click the QB icon and press and hold the Ctrl key till the No Company Open window appears on the screen.
- In the No Company Open window, select the Open a Sample File option and choose a file from the list of sample company files.
- If the sample file gives you the same error message, you need to repair your QuickBooks installation files by implementing solution 3 below.
- In another case, if the sample file opens, there are issues with your company file, which can be fixed by implementing solution 4. In simple words, if the sample file opens, jump to solution 4 directly without trying solution 3.
Now, depending on the results, perform solution 3 or solution 4 below.
Solution 3: Repair QuickBooks Desktop from the QB Tool Hub
Issues with the QuickBooks program or the installation process can be fixed by using certain tools of the QB Tool Hub utility. For this, you need to ensure that QuickBooks Tool Hub is correctly installed (see step 1 of solution 2 of the “general troubleshooting solutions” section above). Then, you can perform the steps given below to utilize these tools and run a repair process –
Step 1 – Run Quick Fix My Program
This tool is used to terminate background processes that are used by QB. You can run a quick program repair by using the Quick Fix My Program tool in the following manner –
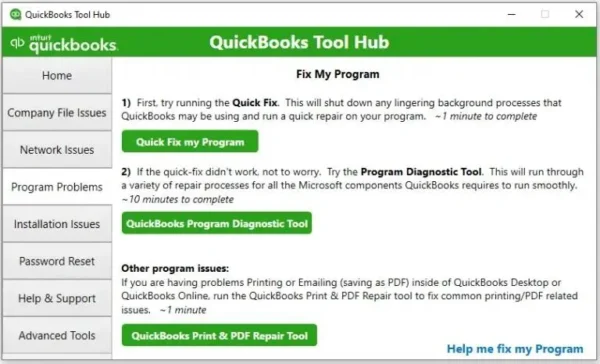
- Open QuickBooks Tool Hub, select Program Problems, then click the Quick Fix My Program tool to initiate the program repair process.
- Once the process ends, restart QuickBooks Desktop and open your data file.
If there are issues while opening the company file, move on to the next step and repair the QuickBooks installation.
Step 2 – Run QuickBooks Install Diagnostic Tool
If the Quick Fix My Program tool is unable to fix the application problems that are interfering with the company file functions, you can run the QuickBooks Install Diagnostic Tool to repair problems with QB installation in the following manner –
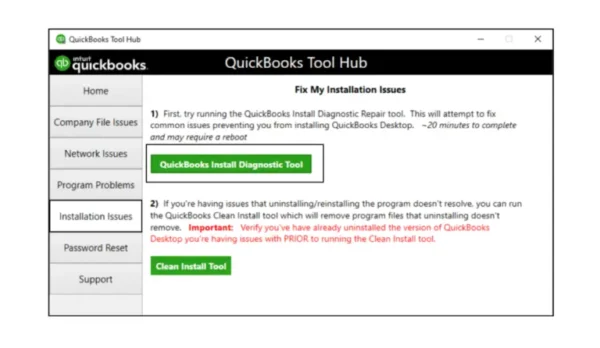
- Open the QuickBooks Tool Hub, then select Installation Issues, and choose the QuickBooks Install Diagnostic Tool.
- Let the tool run, which can take up to 20 minutes. Once it finishes, restart your PC.
- Open QuickBooks Desktop, access your data file, and then update QuickBooks again (see solution 1 of “general troubleshooting solution” above).
Now, check the status of the QuickBooks 6144 82 error by opening the company files again.
Solution 4: Copy the QB File on your Desktop
You need to check if the issues lie within the company file or the file location. For this, you should move the file to another location on your PC and access it from there by using these steps –
- Open the Company File Folder, then find the file with the .QBW extension and right-click on it.
- Select Copy, go to your desktop, right-click anywhere on the desktop, then select Paste.
- Next, hold down the Ctrl key while pressing the QB icon to access the No Company Open window in QuickBooks.
- Lastly, select Open or restore an existing company, then go to your desktop, find your company file, and open it.
If the file opens from the desktop, the location of the original company file might be damaged. It is also possible that your file is stored in too many folders, exceeding the file system path limitation.
In contrast, if the file still doesn’t open after you change the location, you might have file damage. You can move to the next solution to restore the backup version of the company file and fix QB error 6144.
Solution 5: Restore a QuickBooks Company File Backup
If there are problems with the current company file, you can restore its backup. When you restore a backup, QuickBooks uses the backup company file with the .QBB extension to create a new company file with the .QBW extension. You can restore the company file backup in QuickBooks by following the steps below –
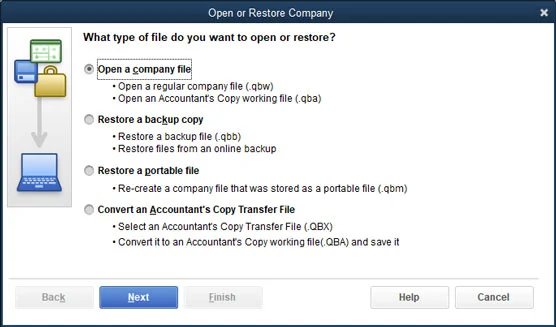
- Go to the QuickBooks File menu, select Open or Restore Company, then click Restore a backup copy.
- Hit Next, select the Local Backup option, and then hit Next again.
- Browse your PC to locate the backup version of the company file, which should look like this – [Your company name].qbb.
- Next, select a folder where you want to save your restored company file, then click Open, and hit Save.
Note: If you open the backup in the same folder as your existing company file, you may run the risk of overwriting the data. To avoid overwriting, you can rename your existing company file or the backup, or you can save the backup in a completely separate folder. - If you see any messages about possibly overwriting your data, choose the most suitable option and don’t overwrite any data unless you know you want to.
If you get an error when you restore the backup, you need to check the hosting setup and review the company file path character limit in the following manner :
Ensure that your PC isn’t hosting the company file –
- Access the QB File menu, choose Utilities, and then open your company file.
- If the Stop Hosting Multi-User Access option is available, select Stop Hosting Multi-User Access and hit Yes.
- Next, select Yes in the “Company file must be closed” window and end the process.
Ensure that the QB company file path isn’t longer than 210 characters –
- Go to the location of your company file and copy the file path from the address bar.
- Paste it to the Notepad, then count the characters and the spaces to ensure that it isn’t longer than 210 characters.
(For instance: C:Documents and SettingsAll UsersDocumentsIntuitQuickBooksSample Company FilesQuickBooks 2018Sample_company_file.qbw is 125 characters long.)
Once done, try to access your company file again, and if you still get the error, go to solution 6.
Solution 6: Recover Lost Data with QuickBooks ADR Tool
If the original company file is damaged and you are unable to restore the company file backup, the next option is to recover the lost data with the QuickBooks Auto Data Recovery Tool. This tool is used to fix data loss or corruption issues and can help you recover lost files by –
- Restoring the recently lost transactions by using the current Transaction Log file and a copy of the QuickBooks Company file.
- Restore all transactions except the last few hours by using a copy of both your QuickBooks Company file and your Transaction Log file.
Points to Remember:
- You can run the ADR tool in QuickBooks Pro, Premier, and Enterprise Solutions for Windows; however, it is not available in Accountant Editions.
- The ADR tool has file size restrictions, and QuickBooks will not generate an ADR file if the backup is bigger than 1.5 GB.
- Ensure that QB is updated to the latest release to maximize the ADR feature.
You can use the ADR tool utility by performing these detailed steps –
1 – Recover Recent Transactions with the Original .TLG File & the .QBW.adr File
You can use the original Transaction Log file and ADR version of the company file to recover all recent transactions in the following manner –
- Create a new folder on your desktop named QBTest, then open the folder where the company file is saved.
Tip: If you don’t know the company file location, you can find the location from the Product Information screen (press F2 or Ctrl+1) and the No Company Open Window. - Now, in the Company File Folder, locate the .TLG file with the same name as your company file.
- If you cannot identify the .TLG file, perform these steps to show file extensions on your Windows –
- Press Windows + E and open the File Explorer, then select Organize.
- Choose Folder and search options, select Hide extensions for known file types, then hit Apply and OK.
- Copy the corresponding .TLG file of your company file, then paste it to the new QBTest folder created above.
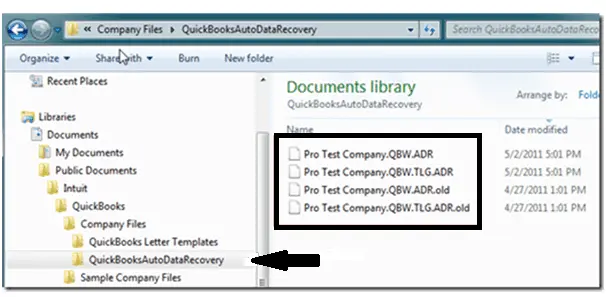
- Open the QuickBooksAutoDataRecovery folder from the same location as your company file, then copy the .QBW.adr file.
- Paste it to the QBTest folder, and you will now have a .QBW.adr and .TLG file present in this folder.
- Access the QBTest folder, right-click the .QBW.adr file, then click Rename and remove .adr from the end of the file name.
- Now, open QuickBooks Desktop and access the company file that is saved on your QBTest folder, then review the transactions.
- Use your account register to verify that all transactions are present, and once done, go to the QB File tab.
- Select Utilities, then click Verify Data to review the data integrity of the recovered file.
- If this company file copy confirms data integrity, you can move the damaged company file to a different location and transfer the copy from the QBTest folder to the original location.
- If you wish to recover all the transactions except the last 12 hours, you can move to the next section to run the ADR tool.
2 – Recover All but the Last 12 Hours of Transactions with .TLG.adr and .QBW.adr Files
In this step, you will use the ADR version of both the .QBW and .TLG files in the following manner to recover all except the last 12 hours of transactions –
- First, create a new folder named QBTest on the desktop, then open the Company File Folder to access the QuickBooksAutoDataRecovery folder.
Tip: If you can’t locate the company file folder, check the file location from the Product Information screen (press F2 or Ctrl+1) and the No Company Open Window inQB. - Look for the .TLG.adr and .QBW.adr files with the same name as your company file.
- If you cannot locate the .TLG.adr and .QBW.adr files, you can enable the file extensions (see point 3 in the first section of this solution).
- Copy the .TLG.adr and .QBW.adr files, paste them into the QBTest folder, then open the folder.
- Right-click the .QBW.adr file and remove the .adr from the end of the file name, which should give you .qbw and .tlg files.
- Now, open QuickBooks Desktop and access the company file saved in the QBTest folder, then verify the transactions.
- Use your account register to verify that all transactions are present, then check the data integrity of the recovered file in the following manner –
- Select the QB File menu, click Utilities, and select Verify Data.
- If this copy of the company file is free of issues, move the damaged company file to another location and transfer the copy from QBTest to the original location.
The ADR tool will help you resolve the data damage problems. Once done, you must access the company file in QuickBooks to check the status of the company file error 6144 82.
Solutions for QuickBooks Error Code 6144 When You Open the Company File Over a Network
If you access the company file saved on the server or another computer, perform the solutions given below to address the file access issues leading to QuickBooks error message 6144 82 –
Solution 1 – Review the Hosting Settings
First, you need to confirm that the hosting is turned off. For that, access the Product Information window by pressing the F2 key.If the hosting is enabled in the Local Server Information section, turn it off and move to the next solution.
Solution 2 – Rename the .ND and .TLG Files and Run QuickBooks Database Server Manager
Since the .ND and .TLG files allow QuickBooks to access the company file in a network or multi-user setup, you need to fix the file damage by renaming the files. After renaming these files, you can run a scan with the QuickBooks Database Server Manager, and QuickBooks will create these files again.
Step 1 – Modify the QB Network Data and Transaction Log File Names
To resolve data damage problems, you can rename the.ND and .TLG files by following solution 1 of the “solutions for QuickBooks error code 6144 when you open the company file locally” section.
Once the names are edited, move to the next step to run the QuickBooks Database Server Manager from QB Tool Hub.
Step 2 – Utilize the QB Database Server Manager
The QuickBooks Database Server Manager is an essential utility that hosts your QuickBooks company files. Once you have renamed the .ND and .TLG files, you can use the QuickBooks Tool Hub (to download the tool, see solution 2 of the “general troubleshooting solutions” section above) and scan the QuickBooks files in the following manner –
- Open the QuickBooks Tool Hub, select Network Issues, and click the QuickBooks Database Server Manager option. Make sure to install QuickBooks on your server PC, if you haven’t already.
- Once the tool is selected, click Start Scan if you see your company file(s). If you don’t, click Browse to locate the company file you want to scan, then select Start Scan.
- Once the scanning process is finished, reopen QuickBooks and try to sign in to your company file.
If you still get QuickBooks error 6144 82, go to solution 3.
Solution 3 – Open a Sample File in QB from a Workstation
You can open a sample file to check if the problem is in your company file or in QuickBooks Desktop. You can follow solution 2 of the “solutions for QuickBooks error code 6144 when you open the company file locally” section to open a sample file.
- If the sample file doesn’t open, the issues lie within QuickBooks, which can be fixed by using the QuickBooks Tool Hub utilities (see solution 3 of the “solutions for QuickBooks error code 6144 when you open the company file locally” section).
- If the sample file opens, you need to copy the QuickBooks file to the desktop (see solution 4 of the “solutions for QuickBooks error code 6144 when you open the company file locally” section).
After you have copied the QB file or repaired QuickBooks (as per the results after opening the sample file), check if the file access issues are rectified. If not, move to solution 4 below to terminate QB processes.
Solution 4 – Terminate all QB Processes
If none of the above solutions work, you can try terminating all the QB processes in the following manner to tackle the company file access problems –
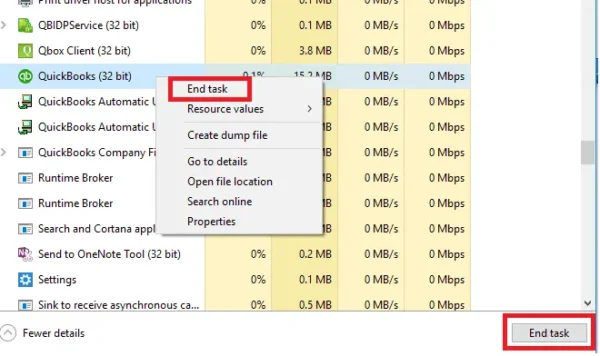
- Sign in as the Administrator on the server computer, then press Ctrl+Shift+Esc to open the Task Manager.
- Show processes for all users, then select the Users option and right-click each QB process (namely QBW32.EXE, qbupdate.exe, and QBDBMgr.exe).
- Hit End Task, and once all the processes are terminated, open the company file in multi-user mode.
If QuickBooks Desktop error 6144 82 persists, move to the next solution to edit the folder permissions.
Solution 5 – Manually Review the QB Folder Permissions
If the folder that contains QuickBooks company files does not have enough permissions, it can lead to QuickBooks error 6144. To address this scenario, you can edit the folder permissions manually in the following manner –
Note: If you are using Microsoft Windows Home Edition, you need to run QuickBooks in Windows Safe Mode to edit the permissions.
To verify that the folder permissions are correctly set –
- Open the Start menu, then click File Explorer, and right-click the folder that contains the company file.
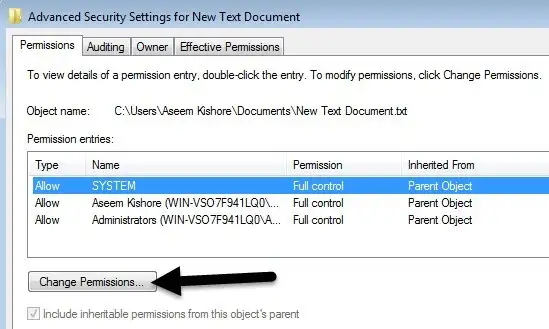
- Select Properties, then go to the Security tab, and select Advanced.
- Click QBDataServiceUserXX (where XX stands for the QB Desktop version), then hit Edit, and set the following settings to Allowed:
- Traverse Folder/Execute File
- List Folder/Read Data
- Read Attributes
- Read Extended Attributes
- Create Files/Write Data
- Create Folders/Append Data
- Write Attributes
- Write Extended Attributes
- Read Permissions
If the folder permissions are not set correctly –
- Right-click the company file folder, select Properties, then click Security.
- Hit Edit, then choose QBDataServiceUserXX (where XX stands for the QB Desktop version)and select Full Control.
- Select Allow, then hit Apply and OK to save the changes.
To set Windows access permissions to share QB company files (in Windows 10) –
- Open the Start menu, access the File Explorer, then locate and right-click the company file folder.
- Select Properties, click Sharing, then select Share Add.
- Select the corresponding QBDataServiceUserXX (where XX stands for the QB Desktop version), then set the permission level of both users to Full Control.
- Lastly, select Share and end the process.
Once the permissions are correctly set, try accessing the company files to check if the error has been eliminated. If the error code still appears, move to the next solution to resolve it.
Solution 6 – Configure Windows Firewall and Antivirus Settings for QB
If the above solutions don’t work, you can try configuring the Windows firewall and antivirus settings manually. This will remove any blockages or obstructions while accessing the company files in QuickBooks.
To reconfigure the Windows firewall, you need to first run the QuickBooks File Doctor Tool (see solution 2 of the “general solutions” section). If the company file access issues are not rectified after running the tool, you can manually set firewall exceptions for QB by following the steps below –
Add Firewall Port Exceptions for QB
If you use more than one QB Desktop version on the same PC, these steps need to be performed for each version.Therefore, follow the steps below to configure the firewall manually.
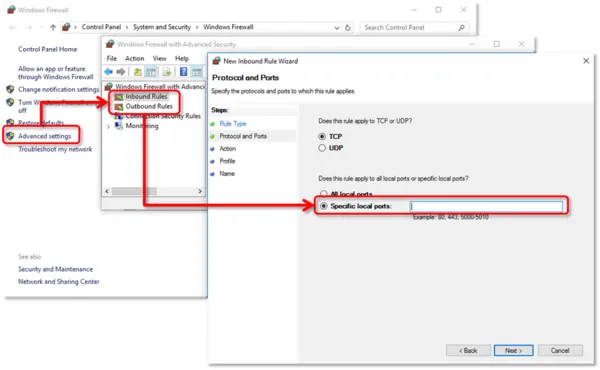
- Access the Windows Start tab, type “Windows Firewall” in the search panel, then open the utility.
- Move to the Advanced Settings section, then locate and right-click Inbound Rules, and click New Rule.
- Select Port, hit Next, then make sure that the TCP option is selected.
- Enter the specific ports as per your QB Desktop version in the Specific Local Ports field from the list of ports below –
- QuickBooks Desktop 2020 and later: 8019, XXXXX.
- QuickBooks Desktop 2019: 8019, XXXXX.
- QuickBooks Desktop 2018: 8019, 56728, 55378-55382.
- QuickBooks Desktop 2017: 8019, 56727, 55373-55377.
Note: Remember, if you have multiple QB versions, you need to add each year’s (versions) ports to the specific ports list.
Important: QuickBooks Desktop 2019 and later versions use dynamic ports, which are specific firewall ports assigned during installation to ensure that QB gets exclusive use of a particular port.
- Perform these steps to find and enter the Dynamic Port Number as per your QB Desktop version.
- Open the Start menu, enter “QuickBooks Database Server Manager” in the search panel, then access the utility.
- Go to the Port Monitor section, find your QB version, and make a note of the Port Number to add to the port exceptions list.
Note: You can modify the assigned port number (for QB Desktop 2019 and later versions) by clicking Renew. If you choose to renew the port number, you can set firewall permissions again by selecting Scan Now from the Scan Folders tab.
- After you enter the port number, hit Next and choose Allow the Connection, then hit Next again.
- Ensure all profiles are marked (if prompted), then select Next and create a new exception rule named “QBPorts(year).”
- Now, select Finish and repeat the steps above in the same manner to create Outbound Rules.
Note: To create Outbound Rules for QB, perform steps 1 to 7 as it is; however, select Outbound Rules instead of Inbound Rules in step 2.
Once both Inbound and Outbound Rules are created, access QuickBooks in a multi-user mode or over the network from the host PC. If you still see issues while accessing the company files, create firewall exceptions for QB executable files in the next section.
Add Firewall Exceptions for .EXE Files
QuickBooks uses executable files (.exe) to perform various functions, and you need to add exceptions to these files to prevent blockages by using these steps –
- Open the Windows Start menu, search for “Windows Firewall” in the search bar, then access the utility, and then select Advanced Settings.
- Right-click Inbound Rules, then select New Rule and click the Program option.
- Hit Next, choose This Program Path, and click Browse to select an executable file from the list below –
- AutoBackupExe.exe
- Dbmlsync.exe
- DBManagerExe.exe
- FileManagement.exe
- FileMovementExe.exe
- IntuitSyncManager.exe
- QBCFMonitorService.exe
- QBDBMgr.exe
- QBDBMgrN.exe
- QBGDSPlugin.exe
- QBLaunch.exe
- QBServerUtilityMgr.exe
- QBW32.exe
- QuickBooksMessaging.exe
- Click Next, select Allow the Connection, then hit Next again.
- Ensure that all the profiles are selected (if prompted), then select Next, and create a rule named “QBFirewallException(name.exe).
- The next step is to create Outbound Rules for QuickBooks in the same manner as you have created Inbound rules.
- To create Outbound Rules, perform steps 1 to 6 again, but make sure to select Outbound Rules rather than Inbound Rules in step 2.
Once the QB rules are successfully created, reopen QuickBooks Desktop in a multi-user environment and check if the blockages are removed. If not, restart your PC to ensure the changes are saved, and if the firewall obstructions continue, review the antivirus program settings in the next section.
Review the Antivirus Settings and Perform a Malware Scan
If you configured your Windows firewall but still have issues while accessing QuickBooks, check your antivirus settings to ensure QuickBooks has general permissions. The troubleshooting steps may vary depending on the antivirus program, and you need to perform the specific steps for your particular antivirus software by following their guidelines.
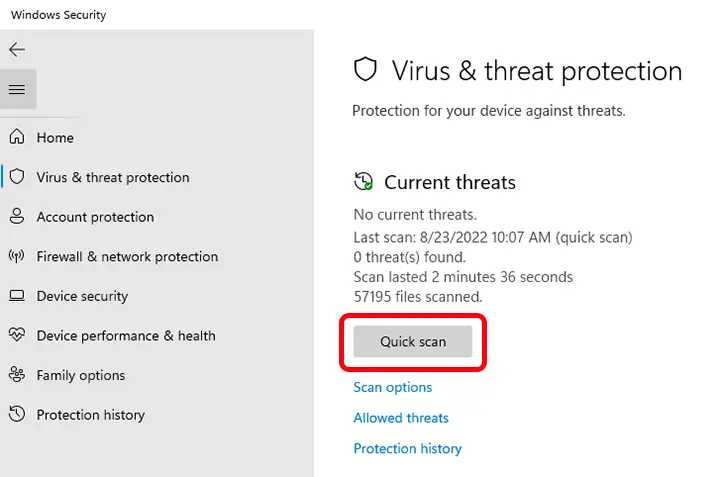
If the issues persist even after editing the antivirus setup, you need to check for malware infections. Your system might be infected with malware and viruses from various sources, which can affect the app’s functioning and trigger several errors, including QuickBooks error code 6144 82. Therefore, completing antivirus and malware scans is critical to recognize and resolve the issue.
Solution 7 – Begin the QuickBooks Monitoring Service Option
The QuickBooks monitoring service can help you fix the 6144 82 error in QuickBooks Desktop. Run it by following the detailed steps below:
- From the Windows Start menu, go to the Services tab, then access the Service list.
- Find the “QBCFMonitoringService” icon from the “Services” list that opens.
- When you click on the same, ensure that they are up and running in automatic mode.
- If that is not the case, you need to press the Radio icon > Apply > OK.
Wrapping Up
If you are still getting the error, then this could be a result of damage to the company file and network. You can use QuickBooks File Doctor to resolve common company file corruption and network damage.
With these steps, one can quickly fix the QuickBooks error 6144 82. If you still face any issues with your software, you can try to restore the backup of the company file. In case you need help to implement the troubleshooting steps mentioned in this article, then talk to our experts by reaching us at 1.855.738.2784. Our team will help you out with every possible solution.
FAQs
What is QuickBooks error 6144 82?
QuickBooks error 6144 82 is a 6XXX series error that arises while accessing the company files. This error can occur due to an incorrect network setup and can prevent users from running the company files.
What are the Early Signs and Symptoms for Error 6144 82 in QuickBooks Desktop?
When your system gets infected with QB error 6144 82, you face the following impacts:
1. Any active and opened application will crash.
2. Error 6144 82 will display on the screen while the background program seizes to respond, behaves slowly, or shuts down.
3. The Windows OS may perform sluggishly and not respond quickly.
4. Periodic freezing of the QuickBooks application at regular intervals can affect your system.
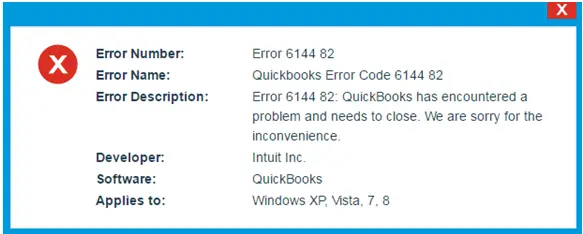
5. The following error message can flash on the screen:
“QuickBooks Error 6144 82: The application is facing some trouble and needs to close. We apologize for the inconvenience.”
What are the major causes for QuickBooks error 6144 82?
QB error code 6144 82 can arise due to the following common reasons –
The company file might be corrupted or damaged in QB.
The company file might be stored in an incorrect or damaged folder.
The network setup might be misconfigured while accessing the company file.
The .ND and .TLG files might be damaged or corrupted.
How to resolve QuickBooks error 6144 82?
You can easily dismiss QuickBooks error code 6144 82 by using these solutions –
Run the QuickBooks File Doctor tool.
Update QuickBooks to the latest release.
Restore the data backup.
Recover lost and damaged files with the ADR tool.
Rename the .ND and .TLG files.
What should be taken care of before resolving error 6144 82 in QuickBooks?
Implement the following points before troubleshooting error 6144 82:
1. Perform all the solutions on the host server system.
2. Undertake a complete malware and antivirus scan on the system.
3. Clean the system’s junk using disk cleanup.
4. Ensure to shut down all the systems properly, including the host and others.
5. Update the system device drivers.
6. Turn the system security software off.